Spring Nail Designs
15 Memorial Day Nail Mistakes You Must Avoid in 2026 for a Flawless Look

This article highlights 15 common Memorial Day nail mistakes to avoid in 2026, ensuring your nails look flawless for the holiday. From choosing the right colors to maintaining nail health, these expert tips will help you achieve the perfect festive manicure. Celebrate Memorial Day in style with nails that are both patriotic and picture-perfect!
What are Memorial Day Nails?
The Memorial Day weekend is not just a time to honor heroes; it’s also an opportunity to look your best and stand out with the perfect nails. From BBQs to parades, Memorial Day celebrations are filled with fun and excitement, and your nails should be no exception.
But before you dive into the latest nail trends, here are 15 Memorial Day Nail mistakes you need to avoid in 2026. By steering clear of these common errors, you’ll ensure that your nails are not only festive but flawless all weekend long.
15 Memorial Day Nail Mistakes 2026
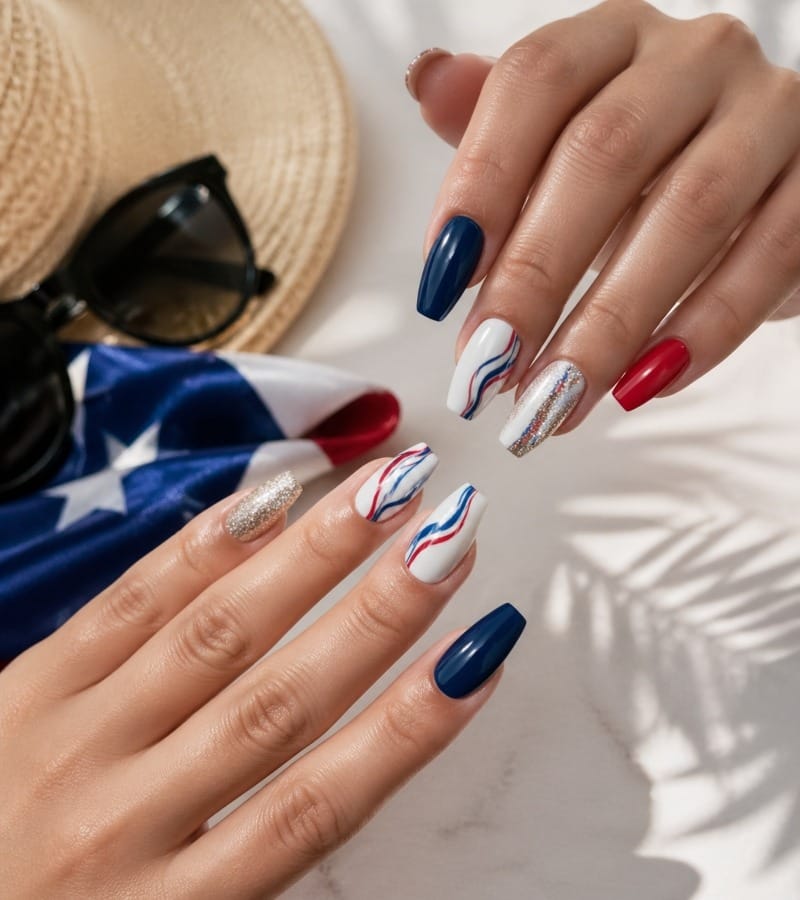
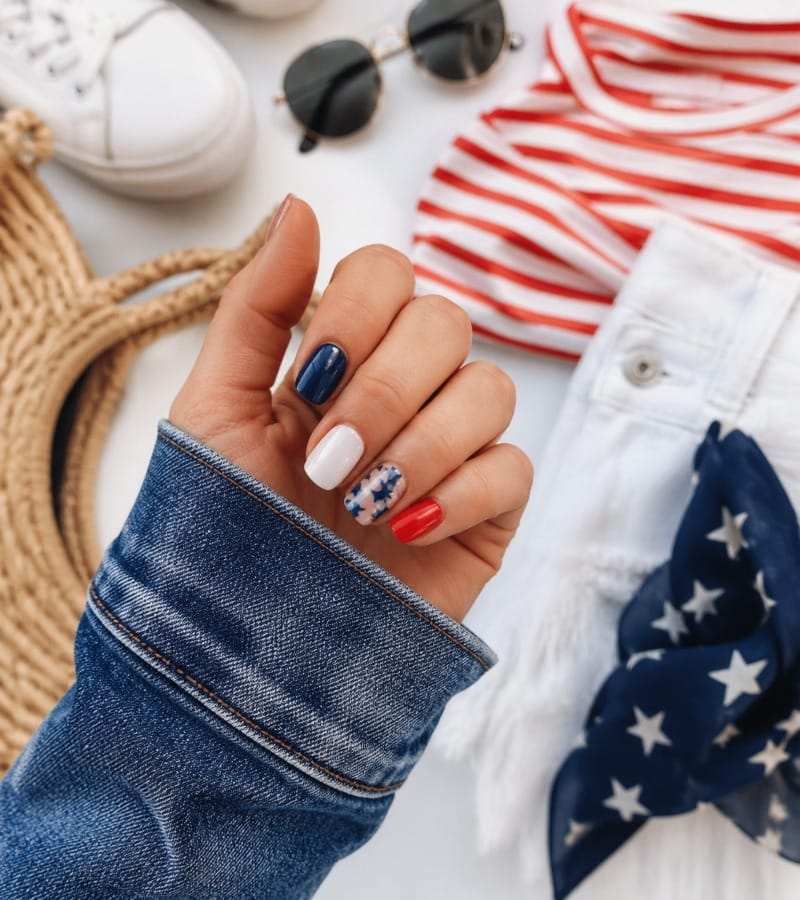
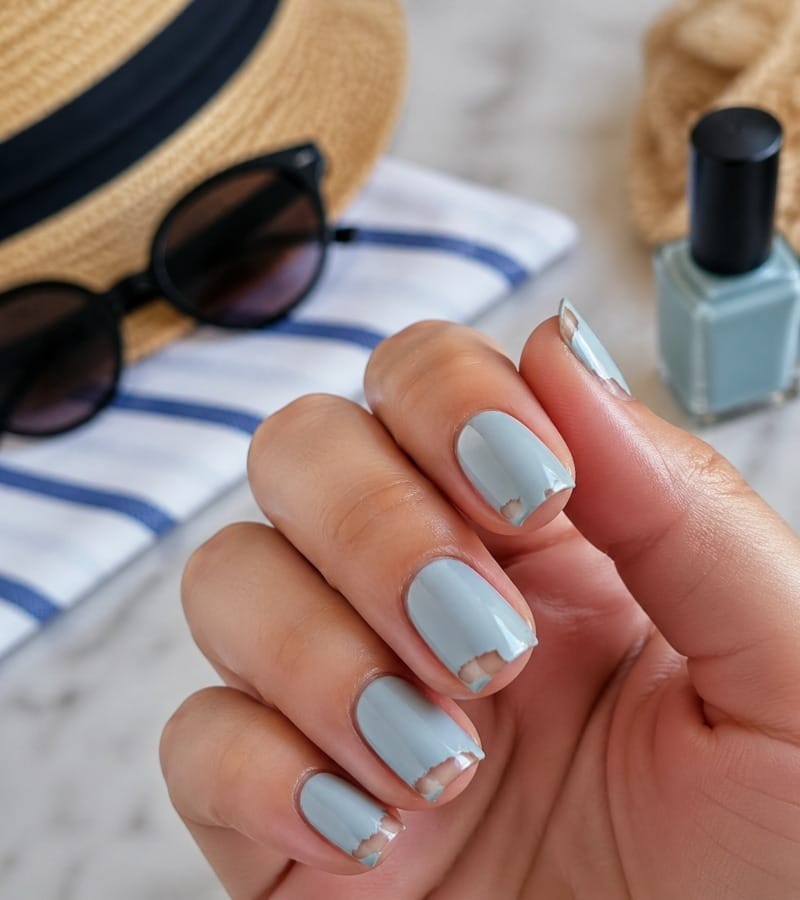
1. Choosing the Wrong Color Scheme for Memorial Day Nails

Memorial Day nails are all about celebrating patriotism and summer vibes. Many people go for bold red, white, and blue colors, but you should consider a few key things when picking the right shades.
Avoid:
- Using colors that don’t represent the holiday spirit.
- Choosing dark, dull colors that feel out of place for a Memorial Day celebration.
Tip: Stick to bright, vibrant hues like cherry reds, white pearlescent finishes, and soft pastel blues. These colors will help create an eye-catching, festive look. And don’t forget to add small touches of glitter for some sparkle!
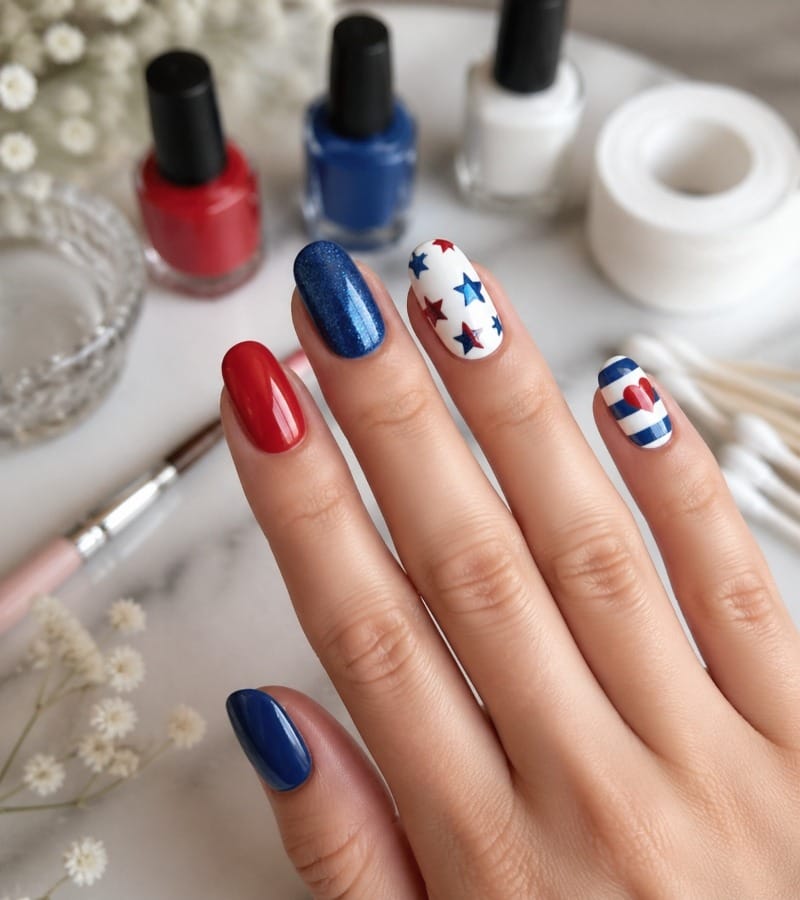
2. Overdoing the Nail Art
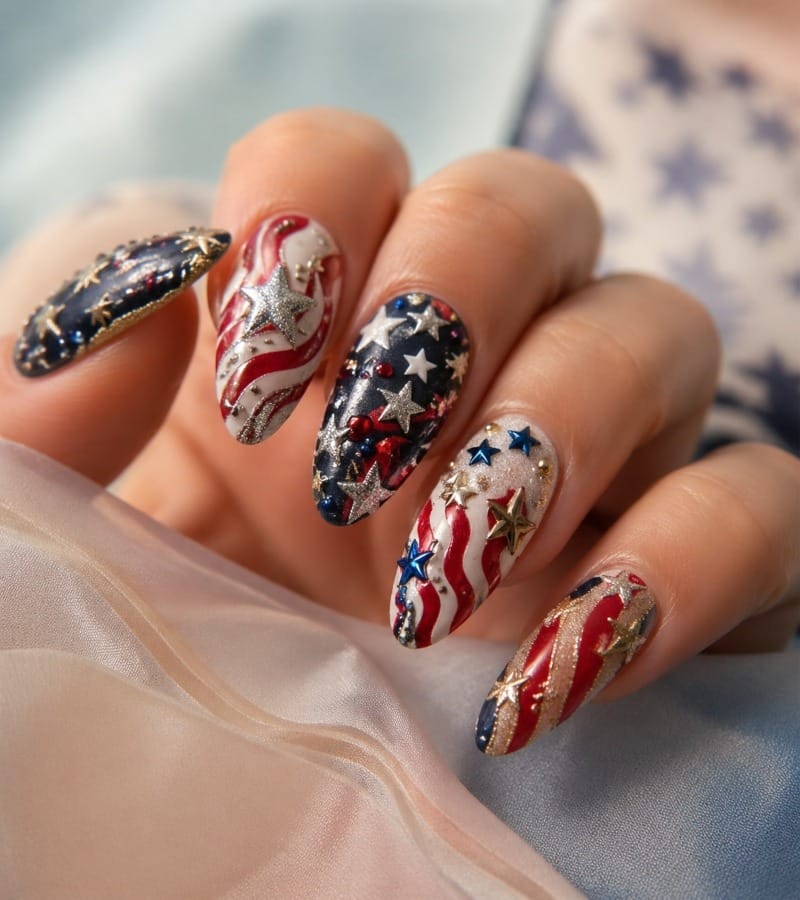
Nail art is a fun way to show off your creativity, but for Memorial Day, less is more. While intricate designs like flag patterns or fireworks might sound tempting, they can be overwhelming if overdone.
Avoid:
- Filling your nails with too many designs.
- Going for overly complex patterns that distract from the overall look.
Tip: Try a simple, chic look with a few accent nails. Maybe a subtle striped pattern or stars for a nod to the American flag. Keep the focus on clean, sharp lines for an elegant finish.
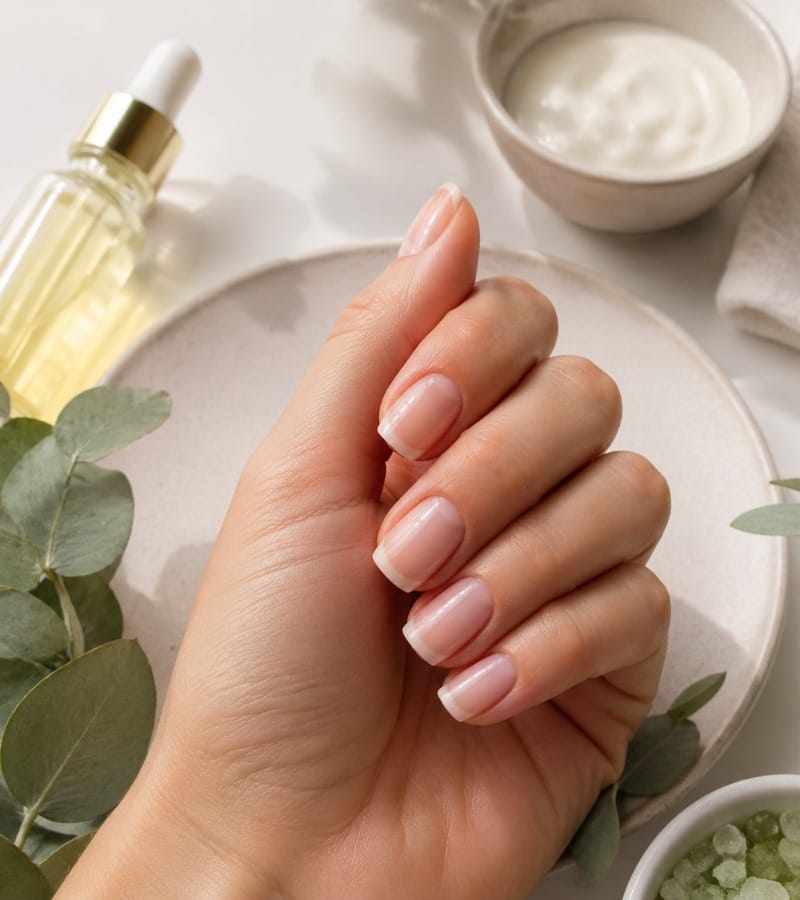
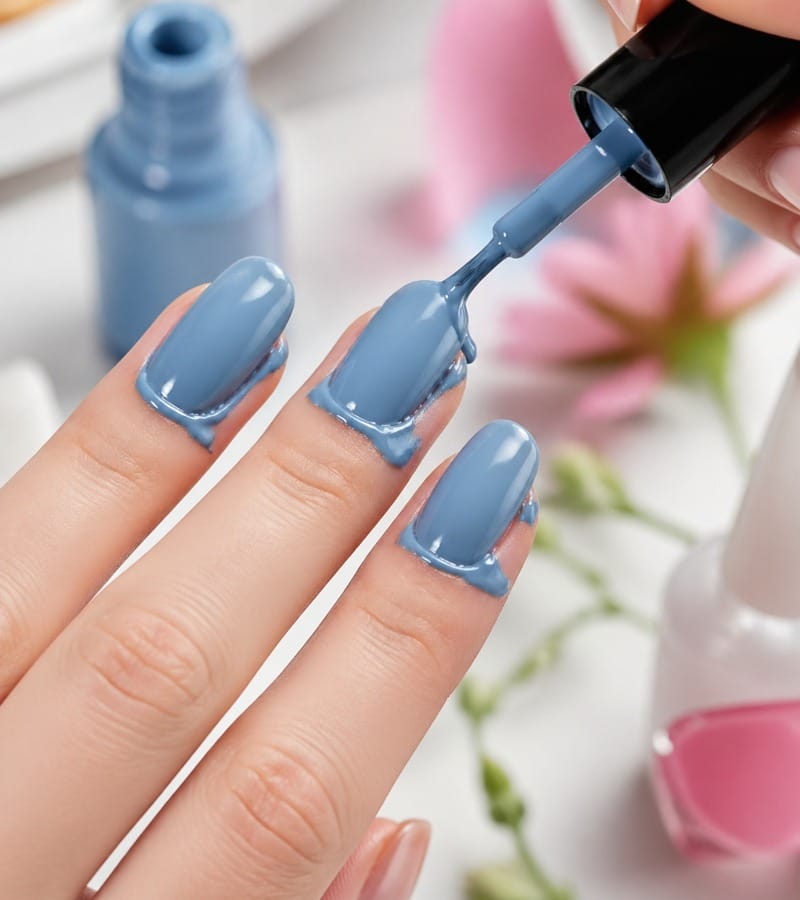
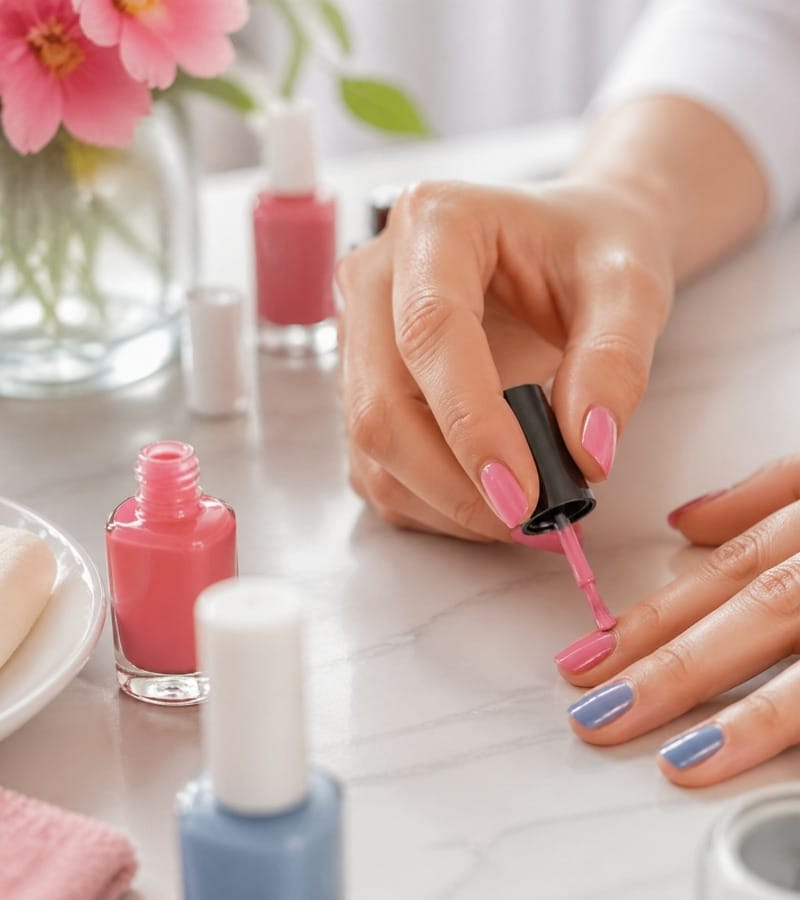
3. Forgetting Nail Care Before Applying the Polish
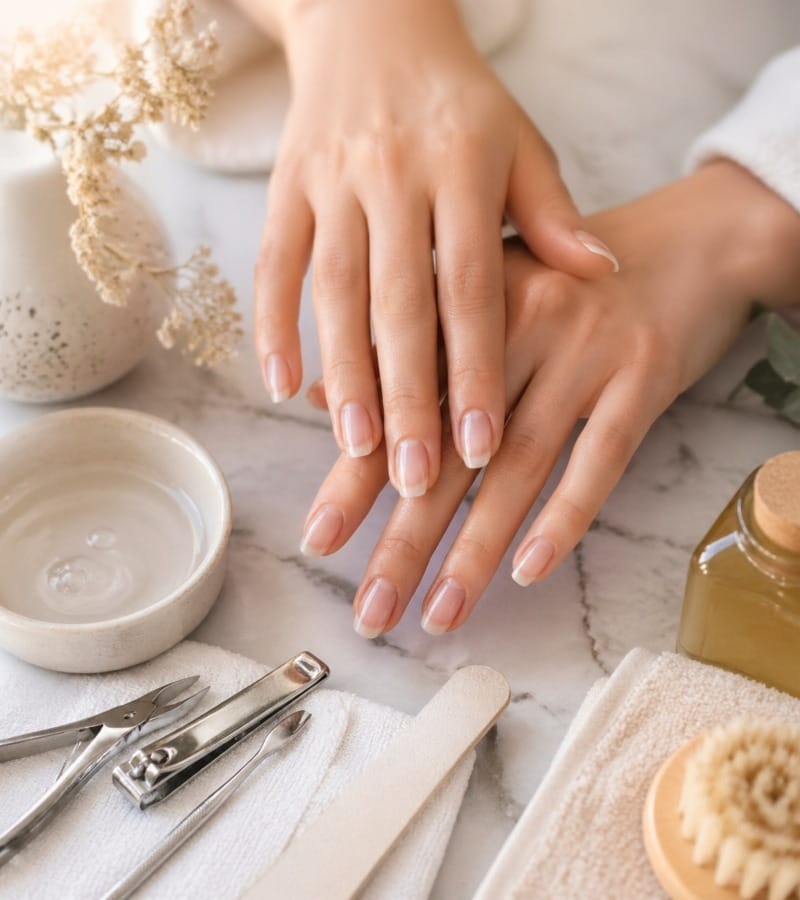
Memorial Day nails should look beautiful and healthy. Too often, people focus on color and designs without considering nail care.
Avoid:
- Skipping nail preparation, such as filing, buffing, and moisturizing.
- Not using a base coat, which can cause stains and damage to your natural nails.
Tip: Make sure to file your nails into a neat shape and hydrate your cuticles. Apply a nourishing base coat before adding your Memorial Day nail polish. This will protect your nails and make the color last longer.
4. Choosing Cheap Nail Products
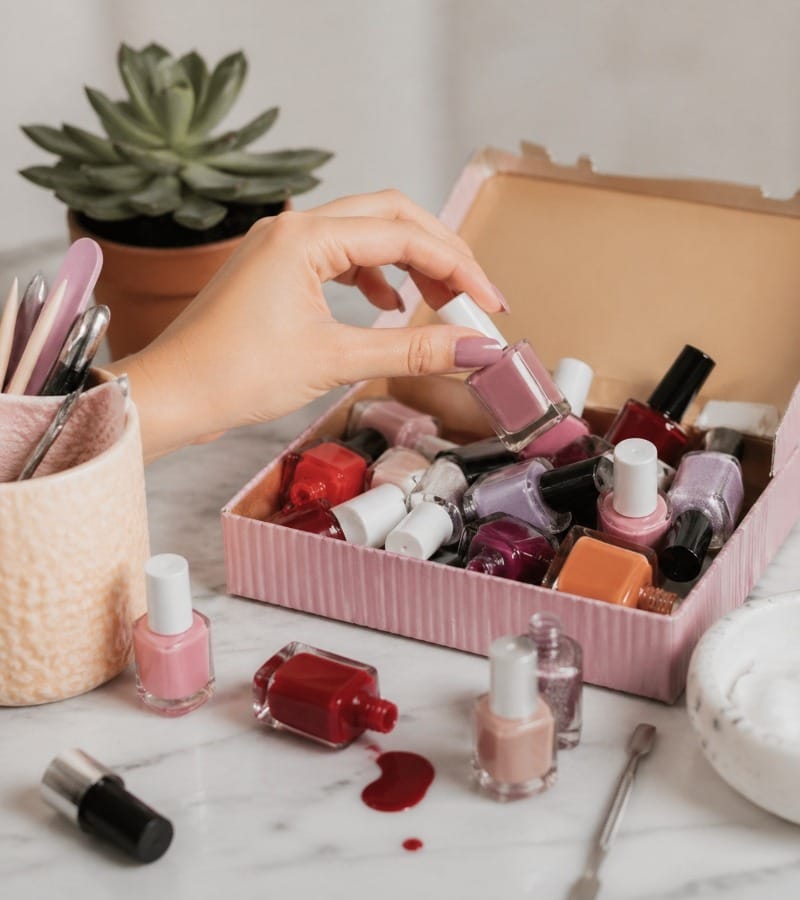
In the rush to get Memorial Day nails ready, some people opt for low-quality, cheap nail products. While they might be tempting, these products can do more harm than good.
Avoid:
- Using low-quality nail polishes that chip quickly.
- Skipping top coats can lead to premature fading and cracks.
Tip: Invest in long-lasting, high-quality nail polishes and always apply a top coat for extra durability. Look for gel polishes for a chip-free finish that can last through all your Memorial Day activities.
5. Ignoring Nail Shape and Length for Memorial Day
Choosing the right nail shape and length is just as important as the color and design. Memorial Day nails should be practical yet stylish.
Avoid:
- Choosing a nail shape that doesn’t suit your finger shape.
- Going for excessively long nails that are impractical for daily activities.
Tip: Opt for a shape like oval or almond for a balance of style and ease. Keep the length moderate to avoid breaking nails during your Memorial Day festivities.
6. Overlooking Nail Health
In the pursuit of festive designs and colors, don’t forget that healthy nails are the foundation of a great look.
Avoid:
- Using harsh chemicals that can damage nails.
- Skipping regular nail maintenance.
Tip: Keep your nails healthy by moisturizing them regularly, avoiding nail biting, and using gentle nail products. Treat your nails with love to ensure they stay strong and beautiful for Memorial Day and beyond.
7. Not Applying the Right Base Coat
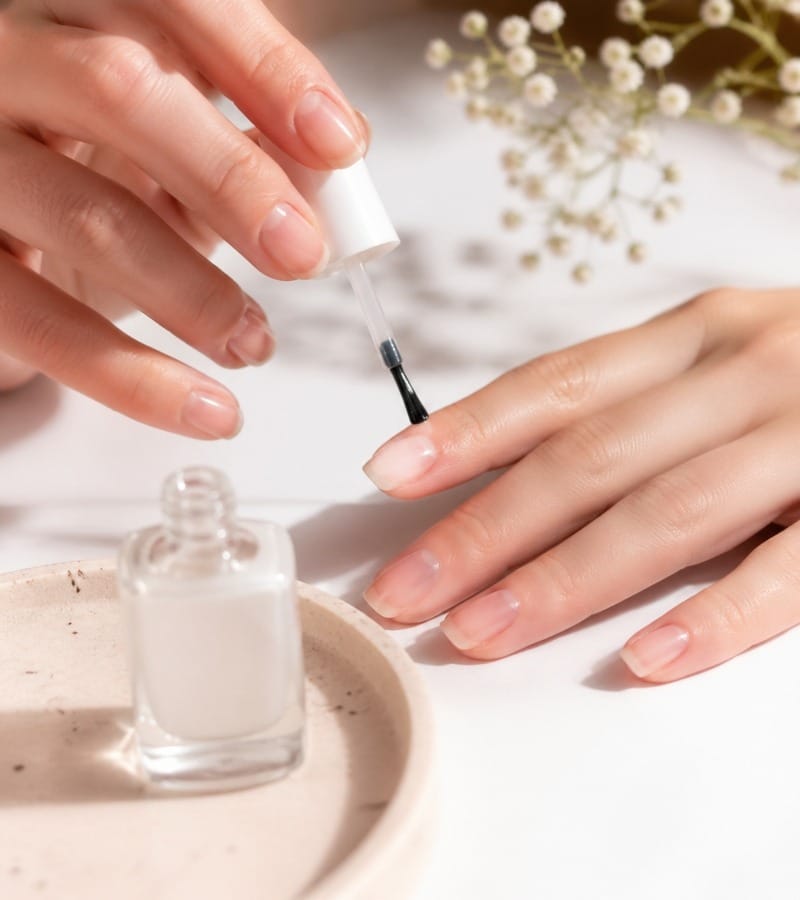
The base coat plays a crucial role in your Memorial Day nails. It’s more than just a layer under the polish.
Avoid:
- Skipping the base coat or using one that doesn’t suit your nail type.
- Not applying it evenly, leading to uneven nail color.
Tip: Use a base coat that promotes adhesion and protects your nails. For extra benefits, use one that strengthens your nails and prevents staining from darker shades.
8. Applying Too Many Coats of Polish
Memorial Day nails should be bold, but applying too many coats of nail polish can ruin the overall look and make your nails look thick and uneven.
Avoid:
- Layering too many coats of polish leads to clumpy nails.
- Not letting each layer dry before applying another.
Tip: Stick to two thin coats of polish for a smooth, streak-free finish. If you want more intensity, go for a gel polish that gives a rich color without the need for multiple layers.
9. Skipping the Drying Process
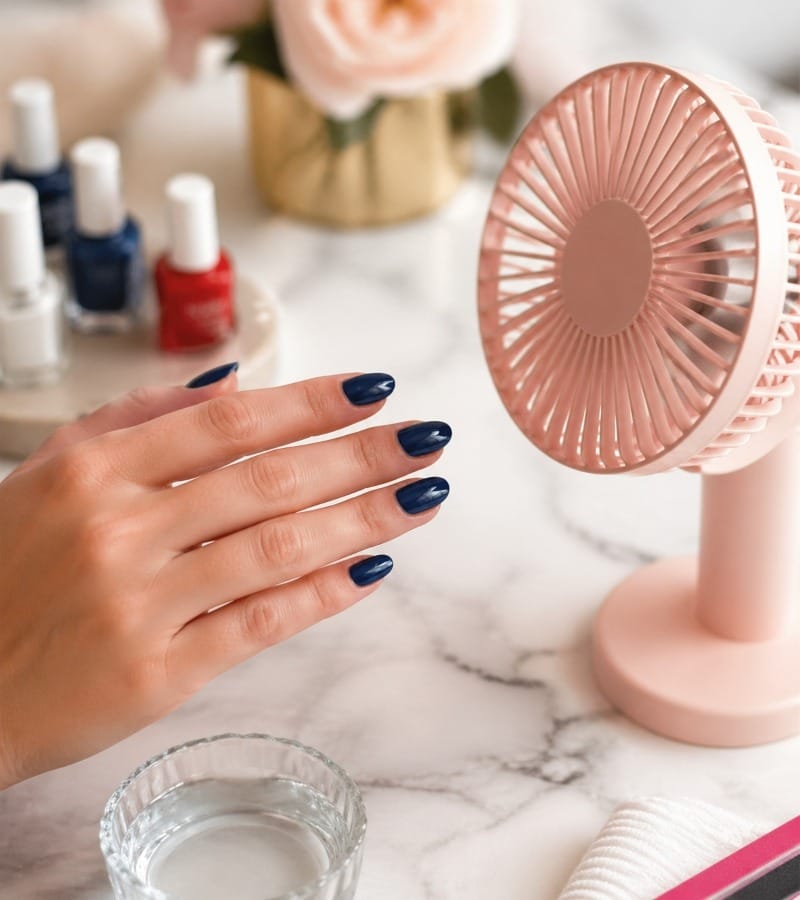
After all the hard work on your Memorial Day nails, don’t rush the drying process.
Avoid:
- Not allowing your nails to fully dry before using your hands.
- Trying to speed up the process with shortcuts that don’t work.
Tip: Give your nails the time they need to dry completely before you engage in any activities. If you’re in a hurry, use a quick-dry top coat to speed up the process.
10. Not Considering Your Outfit
Your Memorial Day nails should complement your outfit. While bold colors are a staple for the occasion, they need to match the overall vibe of your look.
Avoid:
- Choosing nail colors or designs that clash with your clothes.
- Not considering the balance between your nails and the rest of your outfit.
Tip: Plan your nails around the outfit you’ll be wearing. If you’re sporting a simple, monochrome outfit, feel free to go bold with your nails. If you’re wearing a floral dress, try more muted, pastel tones.
11. Forgetting to Clean Up the Edges
The clean-up process after painting your nails is just as important as the application.
Avoid:
- Leaving polish on your skin around the nails.
- Not tidying up stray polish on the sides.
Tip: Use a small brush dipped in nail polish remover to carefully clean around your nails for a crisp, professional finish.
12. Skipping Aftercare

After a long weekend, your Memorial Day nails need some TLC.
Avoid:
- Not giving your nails the attention they deserve after a busy holiday.
- Ignoring moisturizing and cuticle care.
Tip: Post-holiday, hydrate your nails and cuticles with oils or lotions. This will keep them looking fresh and healthy after all the festivities.
13. Not Preparing for Nail Chipping
Your nails will face a lot of activity during Memorial Day – cooking, eating, playing, and more. Without proper preparation, chips are inevitable.
Avoid:
- Ignoring nail chipping prevention.
- Not having a nail repair kit on hand.
Tip: Use a chip-resistant top coat and carry a small nail repair kit with you for emergencies.
14. Ignoring Seasonal Trends
While Memorial Day nails are classic, it’s also important to keep up with current trends.
Avoid:
- Sticking to outdated designs that don’t fit the latest trends.
- Not experimenting with trendy elements like holographic or metallic nails.
Tip: Incorporate trending elements like holographic tips or metallics into your Memorial Day nail design for a modern twist.
15. Rushing Through the Process
Lastly, don’t rush through the nail process. Memorial Day is a time to enjoy, relax, and celebrate, and your nails should be no exception.
Avoid:
- Rushing through nail prep or design.
- Skipping steps to save time.
Tip: Take your time, enjoy the process, and appreciate the results. Great nails come from care and attention to detail.
FAQs
What Color Nails for Memorial Day?
When choosing nails for Memorial Day, it’s important to go for colors that reflect the patriotic spirit of the holiday. Red, white, and blue are always top choices, but you can also opt for a soft pastel blue or creamy white for a more subtle look.
Tip: Consider adding a hint of shimmer or metallic accents to make your nails pop. These hues will give a refined yet festive touch to your Memorial Day look.
What Color Symbolizes Memorial Day?
The colors most strongly associated with Memorial Day are red, white, and blue. These colors represent the American flag and are a tribute to the heroes who served the nation. Wearing these colors helps to honor their sacrifice and spirit.
Tip: While these are the traditional Memorial Day colors, feel free to experiment with ombre effects or add small decorative details like stars to make your design stand out.
What Is the Rich Girl Nail Trend?
The Rich Girl Nail trend is all about elegance, luxury, and simplicity. It focuses on high-shine finishes, long nails, and minimalist designs, with a preference for sophisticated shades like deep navy or metallics.
Tip: For Memorial Day, you can incorporate this trend with subtle red, white, and blue designs. A sleek, glossy blue or elegant white with gold accents can give you that luxurious, patriotic look.
What Is a Good Color for Memorial Day?
While red, white, and blue are always the go-to colors for Memorial Day, you can also try colors like metallic gold, silver, or even a pastel blue. These colors bring a fresh, modern twist to the traditional Memorial Day palette.
Tip: Pair a soft blue with silver accents for a more sophisticated style, or go bold with a vibrant cherry red for a striking look.
Can I Use Glitter on Memorial Day Nails?
Yes! Glitter is a great way to add some sparkle to your Memorial Day nails and make them extra festive. Whether you choose a glittery red or blue or just add a subtle sparkle to one accent nail, glitter will elevate your look.
Tip: Use glitter sparingly to avoid overwhelming your design. You can also combine a glitter accent with classic stripes or stars for a patriotic touch.
How Long Should I Let My Memorial Day Nails Dry?
To avoid smudging and to ensure your Memorial Day nails last longer, it’s essential to give them enough time to dry. Typically, nail polish needs at least 30 minutes to an hour to dry fully, but if you’re in a rush, use a quick-dry top coat.
Tip: Use a drying spray or a fan to speed up the process. However, make sure your nails are completely dry before doing any activities to prevent chips or smudges.
How Do I Make My Memorial Day Nails Last Longer?
To make your Memorial Day nails last longer, it’s essential to take care of your nails both before and after application. Ensure you start with clean, moisturized nails and finish with a long-lasting top coat.
Tip: Avoid using your nails as tools (for opening cans or packages) to reduce the chance of chips. Reapply a top coat every few days to maintain the shine.
Conclusion
Memorial Day is a time to celebrate and honor the sacrifices of those who have served, and your nails should reflect that spirit with a festive, polished look. By avoiding these common Memorial Day nail mistakes, you can ensure that your nails not only look great but also last throughout all the fun and festivities.
Whether you’re choosing the perfect colors, experimenting with designs, or taking care of your nails with the right products, the key to flawless Memorial Day nails is in the preparation and attention to detail. From picking the right shades to ensuring nail health, every step contributes to making your nails the perfect accessory for this important holiday.
Remember, Memorial Day nails are about celebrating patriotism with style, and a little extra care goes a long way. By following these tips, you’ll be ready to flaunt your stunning nails at every BBQ, parade, or party in 2026. So take your time, enjoy the process, and let your nails shine as brightly as the holiday itself!
Now that you’re equipped with these essential tips, it’s time to get creative and make your Memorial Day nails stand out in the best way possible!

Introduction
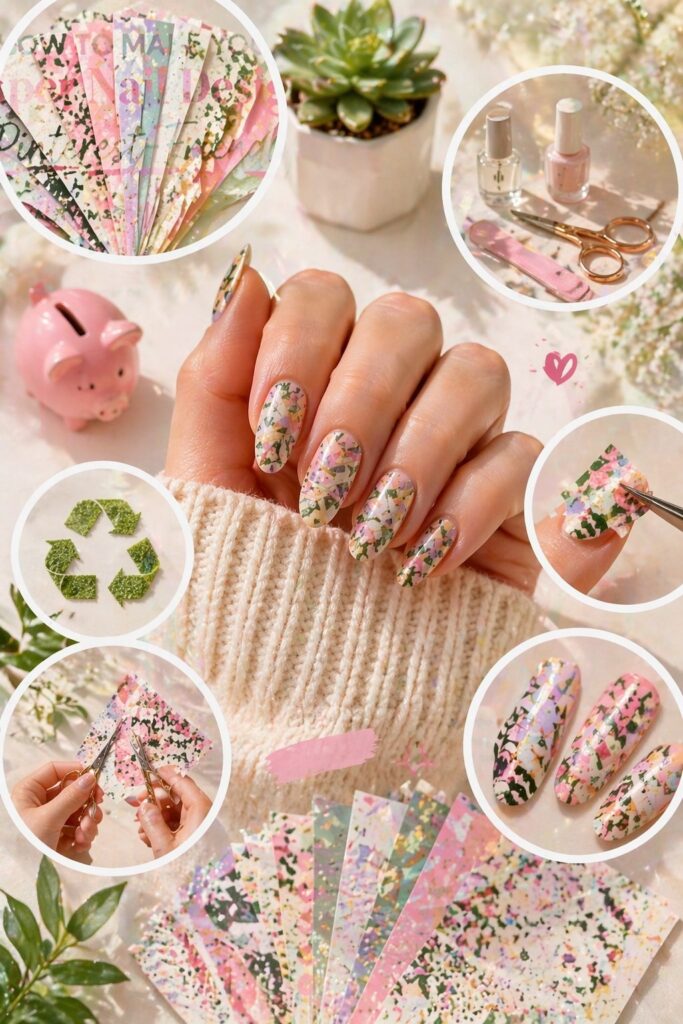
In 2026, paper nail designs are not just a passing trend; they’re a way for people to express their creativity while saving money and time. DIY nail art is growing in popularity, and with paper designs, anyone can achieve professional-looking nails from the comfort of their home.
Paper nails offer flexibility, affordability, and endless possibilities. Whether you’re a beginner or a seasoned pro, paper nail designs provide an excellent opportunity to experiment with your nail art skills.
From geometric patterns to floral prints, in this article, you’ll learn how to create 16 stunning paper nail designs that will make your paper nail designs stand out. Let’s dive into these creative nail ideas and discover the best way to incorporate paper into your manicure.
Why Paper Nail Designs Are Perfect for DIY Enthusiasts in 2026
Paper nail designs have gained momentum in the beauty industry for many reasons. These designs are not only affordable but also customizable, offering a personal touch that’s hard to beat. Let’s explore why paper nail designs are such a popular trend in 2026.
- Affordability and Accessibility
Creating beautiful paper nail designs at home has never been more accessible. Unlike salon manicures that can cost a small fortune, paper nail designs can be made using supplies you already have at home. All you need are simple materials like paper, scissors, glue, and a top coat, making this an affordable DIY solution for those on a budget.
- Endless Creativity
One of the biggest draws of paper nail designs is the endless design possibilities. From abstract patterns to intricate florals, paper designs give you the freedom to get creative and experiment with different textures, colors, and styles.
- Suitable for All Skill Levels
Whether you’re new to nail art or you’ve been practicing for years, paper nail designs are easy to create. With minimal tools required, anyone can enjoy the process and achieve professional-looking nails at home.
- Eco-Friendly
Paper is a sustainable material, making it a great choice for those looking to reduce their environmental impact. Unlike plastic-based nail wraps or stickers, paper nails are biodegradable, helping to minimize waste in the beauty industry.
16 Stunning Paper Nail Designs to Try at Home
Now that you’re equipped with the basics, let’s explore 16 stunning paper nail designs that are perfect for creating unique, eye-catching nail art at home. Whether you prefer a minimalist look or something bold and colorful, you’ll find a design that suits your taste.
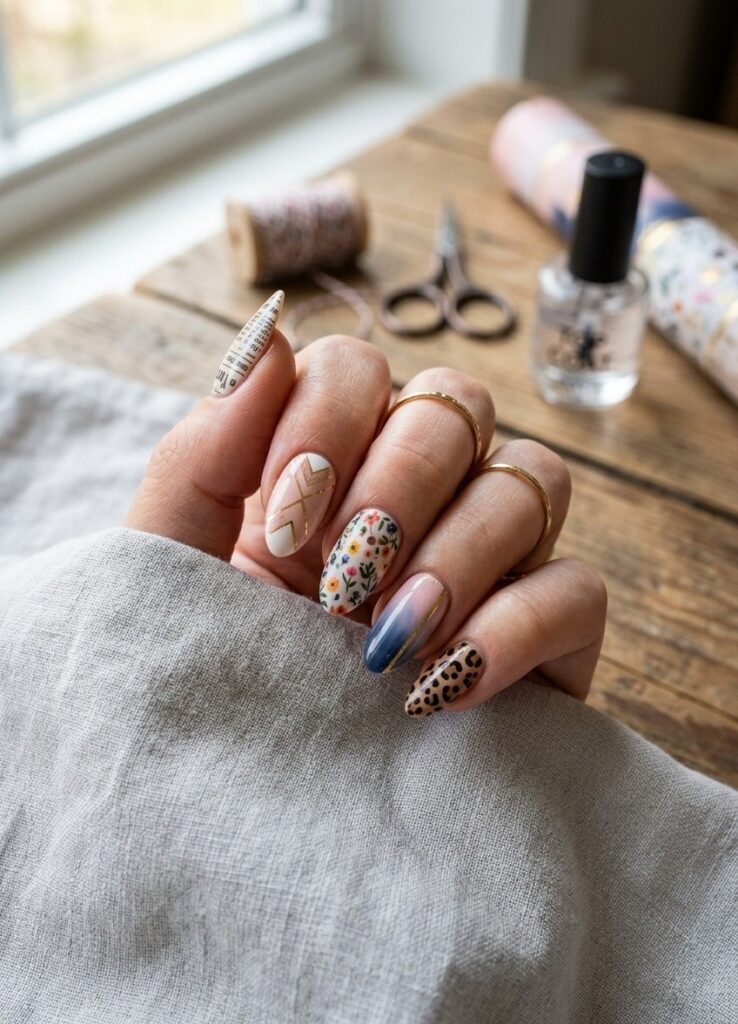
1. Geometric Paper Nail Art
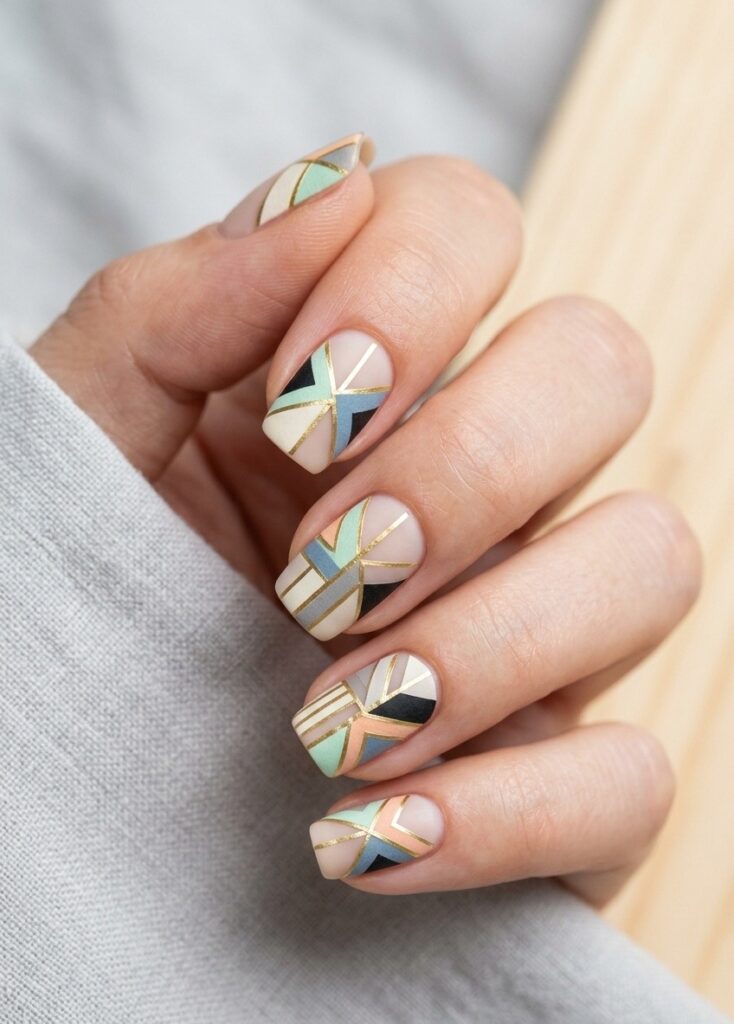
Geometric patterns are perfect for creating clean, modern nail art. Use strips of thin paper to create triangles, squares, or abstract shapes on your nails. Pair these patterns with bold, contrasting colors for a striking design.
2. Floral Paper Nails
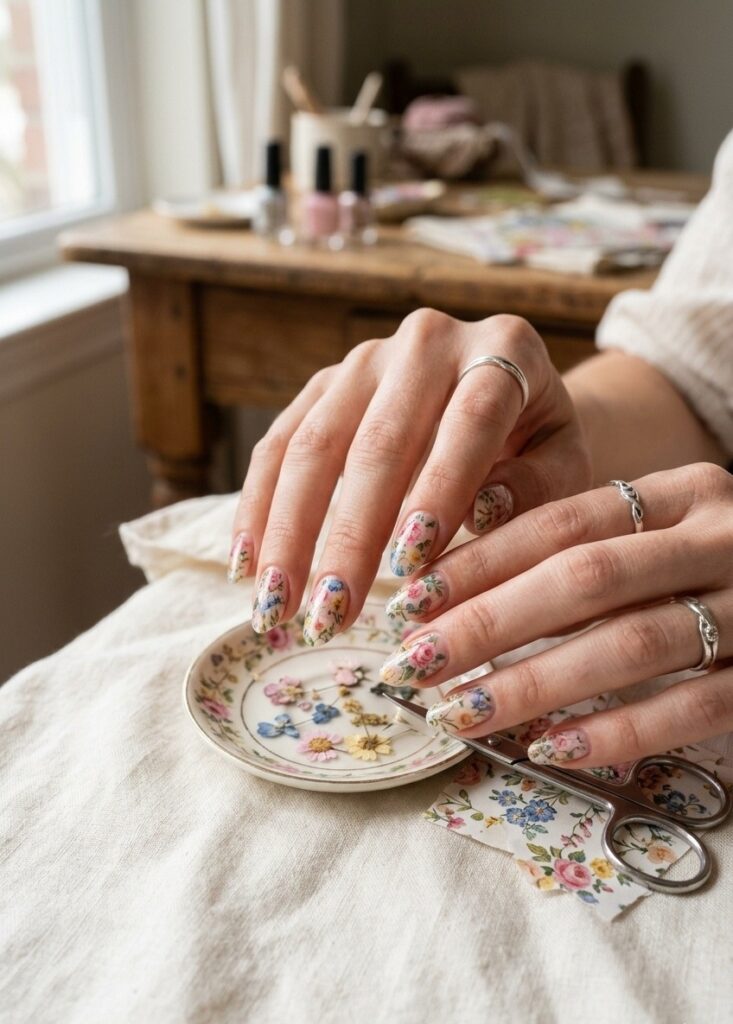
For a soft, feminine look, floral paper designs are always a great choice. Choose paper with delicate flower patterns and carefully cut them out to fit your nails. This design is perfect for spring and summer.
3. Marble Effect with Paper
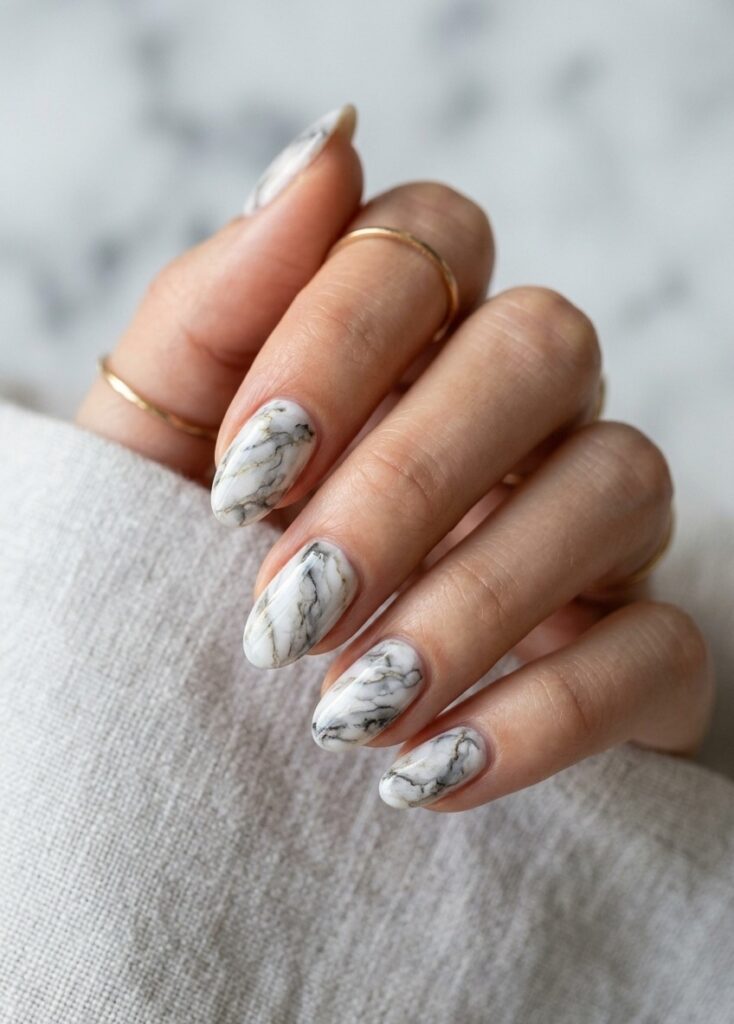
Achieve a sophisticated marble look by tearing paper into irregular shapes and placing them on your nails. The randomness of the design mimics the natural veining of marble, giving your nails a chic, high-end appearance.
4. Abstract Paper Collage Nails
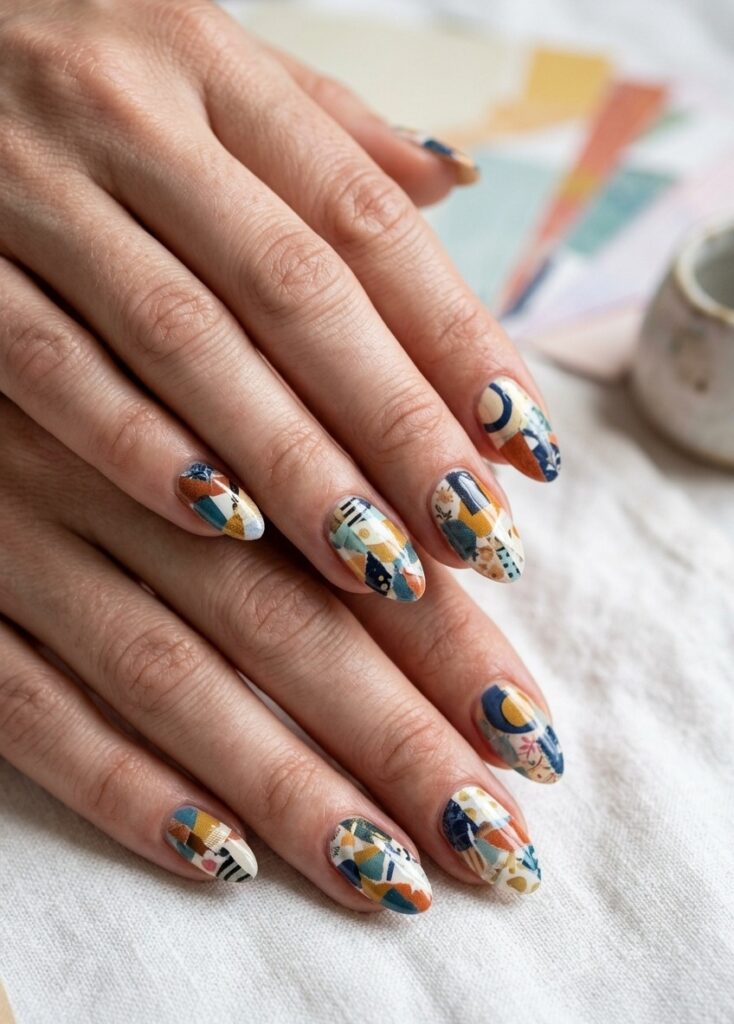
If you love abstract art, try creating a collage on your nails using colorful pieces of paper. This design is perfect for anyone who enjoys experimenting with mixed patterns and textures.
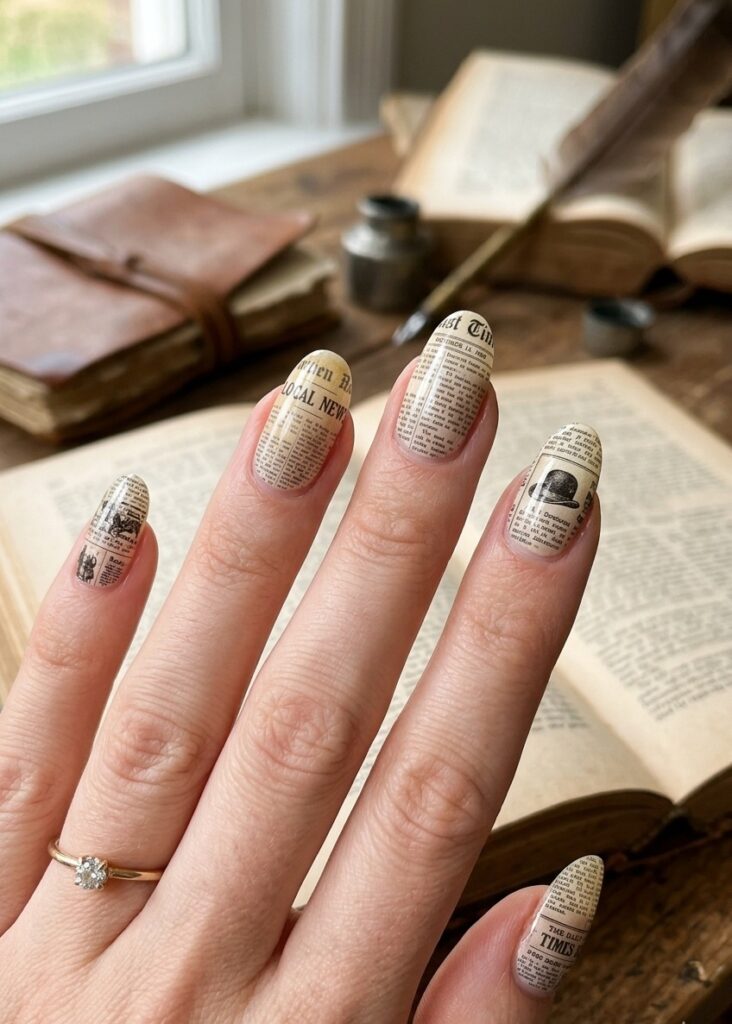
5. Vintage Newspaper Nail Designs
For a retro-inspired look, use newspaper clippings as the main element of your nail art. Cut small pieces of paper with text or vintage designs and place them on your nails for an old-school vibe.
6. Gradient Paper Nails
A gradient effect can be easily achieved with paper by arranging the pieces from dark to light. This subtle fade adds a sophisticated touch to your paper nail designs, making them look elegant and stylish.
7. Polka Dot Paper Nails

Polka dots are fun and playful. Use paper with a polka dot pattern and cut out small circles to create this charming design. It’s perfect for a youthful, fun vibe.
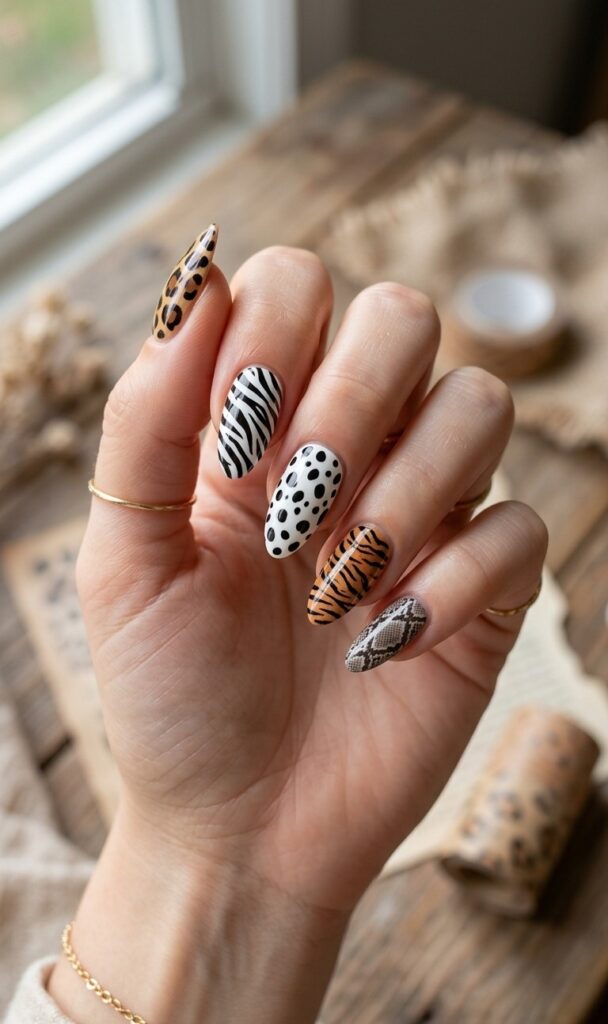
8. Animal Print Paper Nails
Add a bold, edgy flair to your nails by using paper with animal prints like leopard, zebra, or snake skin. These paper nail designs are perfect for those who want to show off their wild side.
9. Holographic Paper Nail Art
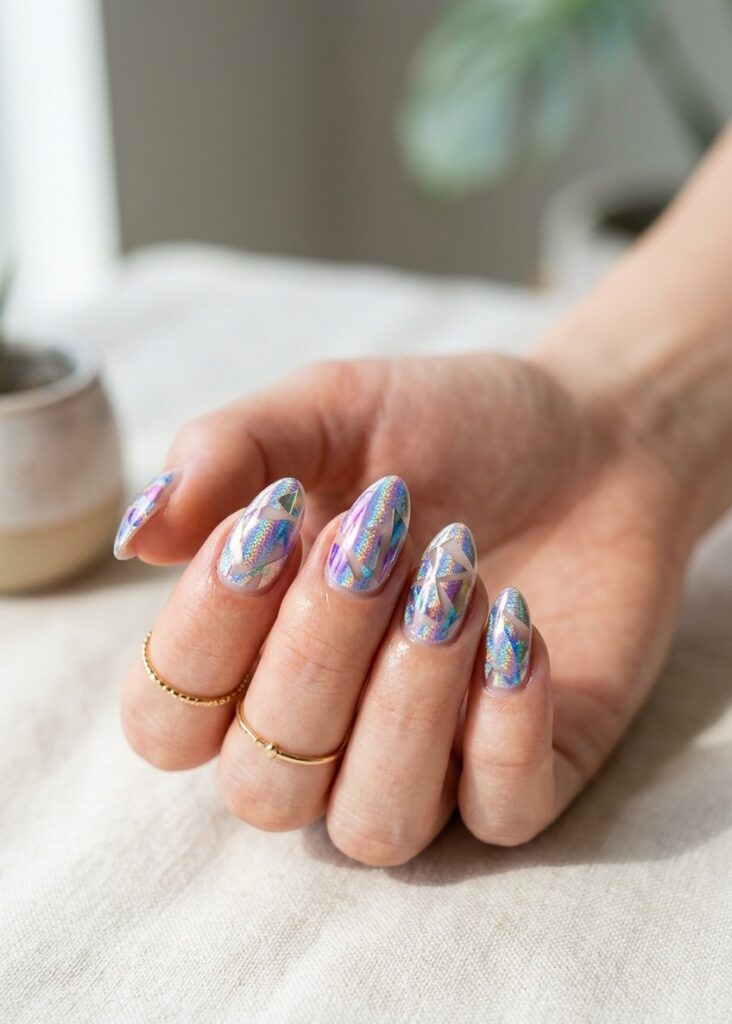
For a futuristic touch, use holographic paper that changes color depending on the light. This eye-catching design gives your paper nail designs a multidimensional, glamorous look.
10. Nature-Inspired Paper Nails
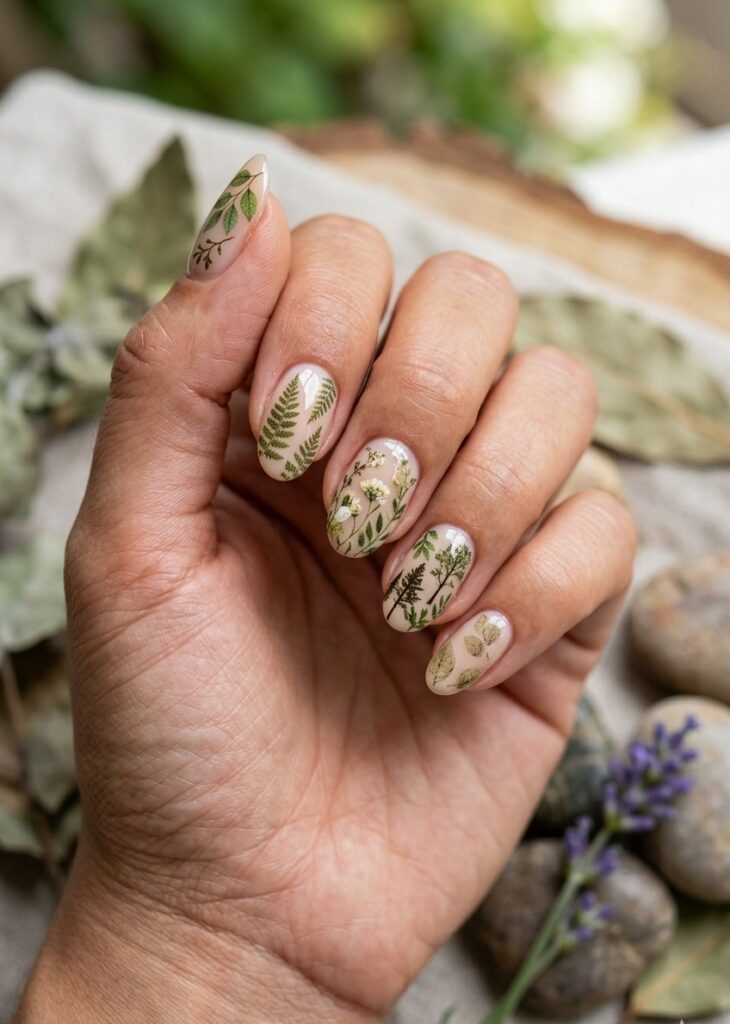
Bring the outdoors to your fingertips by using paper with leaf or tree patterns. These nature-inspired designs give your paper nail designs a calm, organic feel and are perfect for an earthy, boho look.
11. Metallic Foil Paper Nails
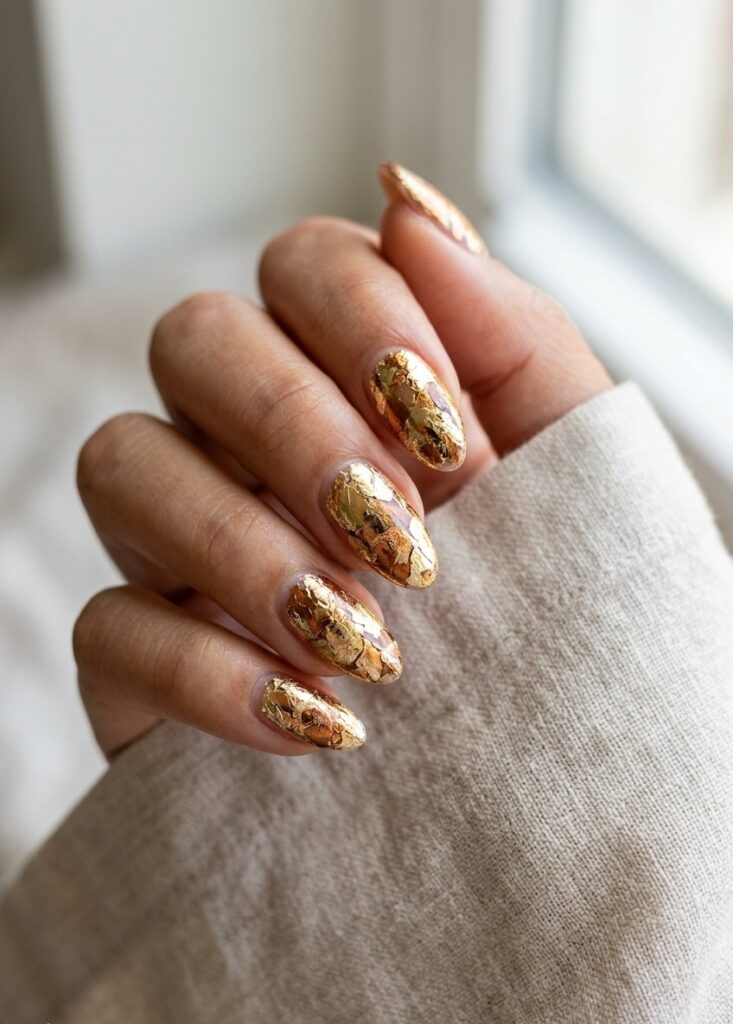
For a luxurious and chic nail design, use metallic foil paper in gold, silver, or copper. Apply the foil in sections to create elegant, high-end nail art.
12. Minimalist Paper Nails
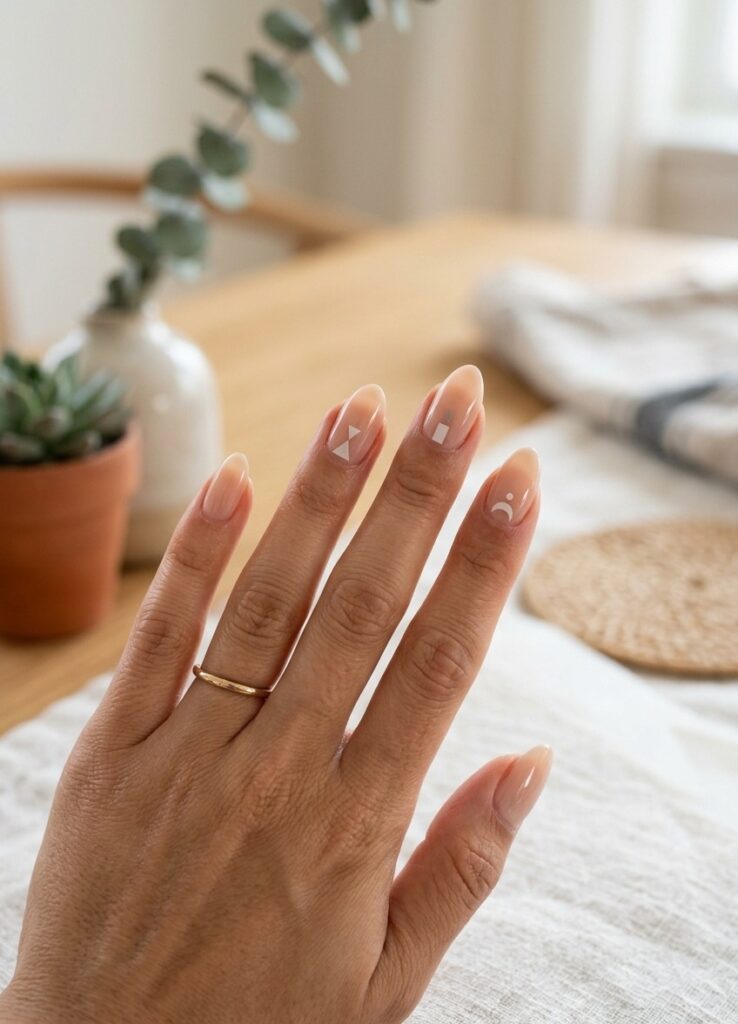
Keep it simple with minimalist paper designs. Use thin, delicate lines or small geometric shapes to create a sleek and modern look. This design is perfect for those who appreciate subtle elegance.
13. Bright and Bold Paper Nail Art
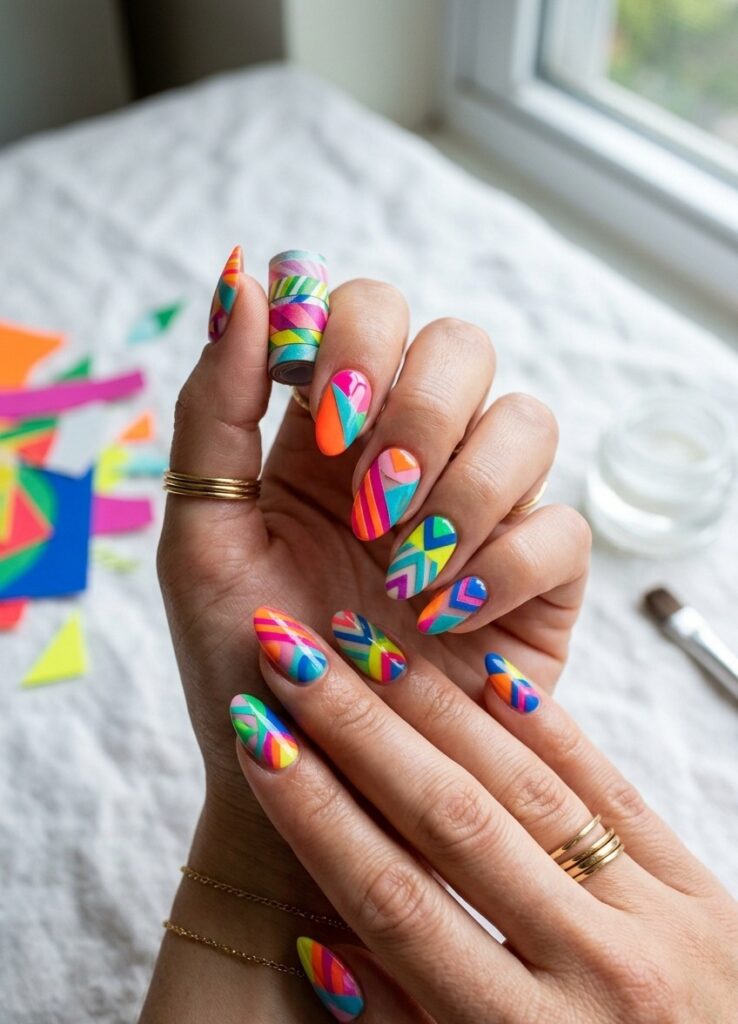
If you love vibrant colors, use neon or bright-colored paper to create bold designs. The contrast of bright hues will make your paper nail designs pop and attract attention.
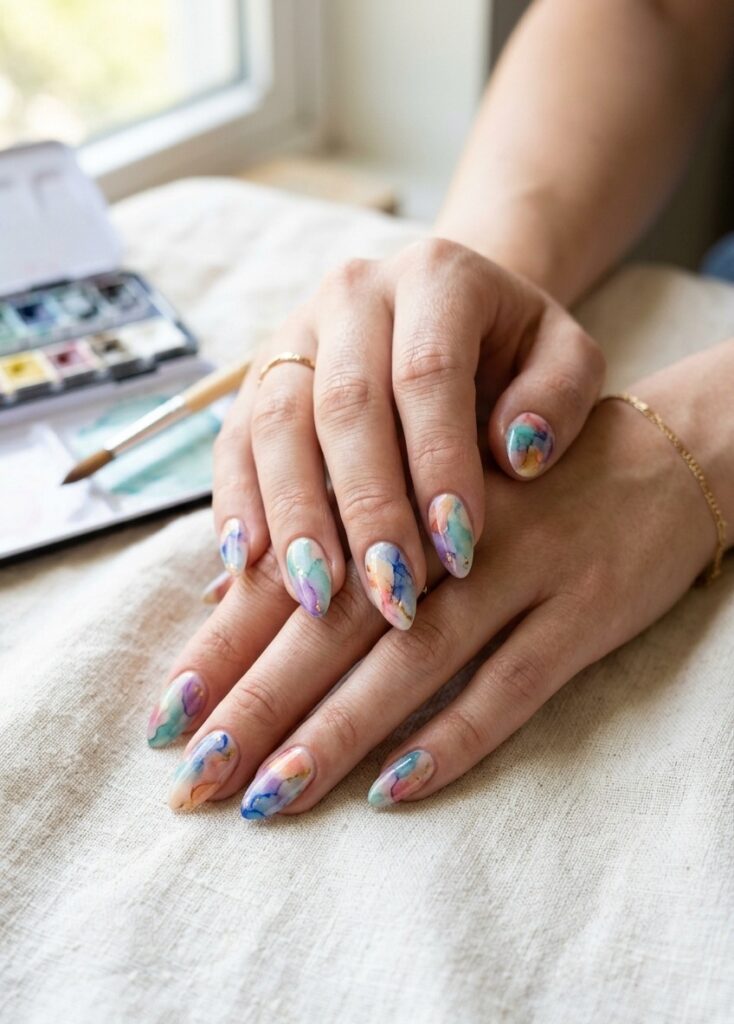
14. Watercolor Paper Nails
For an artistic look, use paper with watercolor-inspired designs. This soft, blended pattern creates an ethereal look that’s both beautiful and unique.
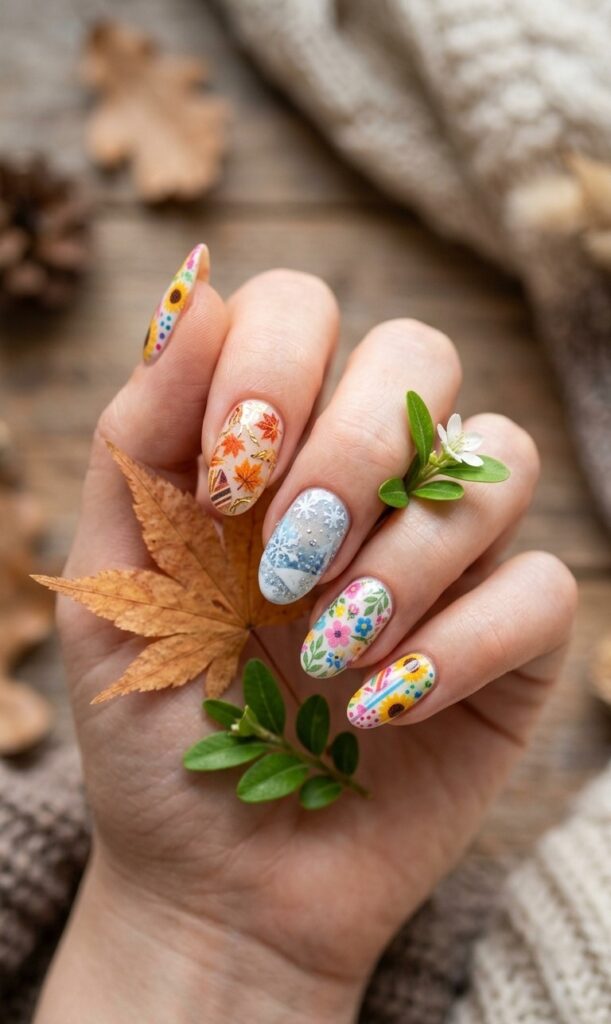
15. Seasonal Paper Nail Designs
Celebrate the changing seasons with seasonal designs. Use paper featuring snowflakes, pumpkins, or floral patterns to reflect the time of year. These paper nail designs are perfect for holiday celebrations.
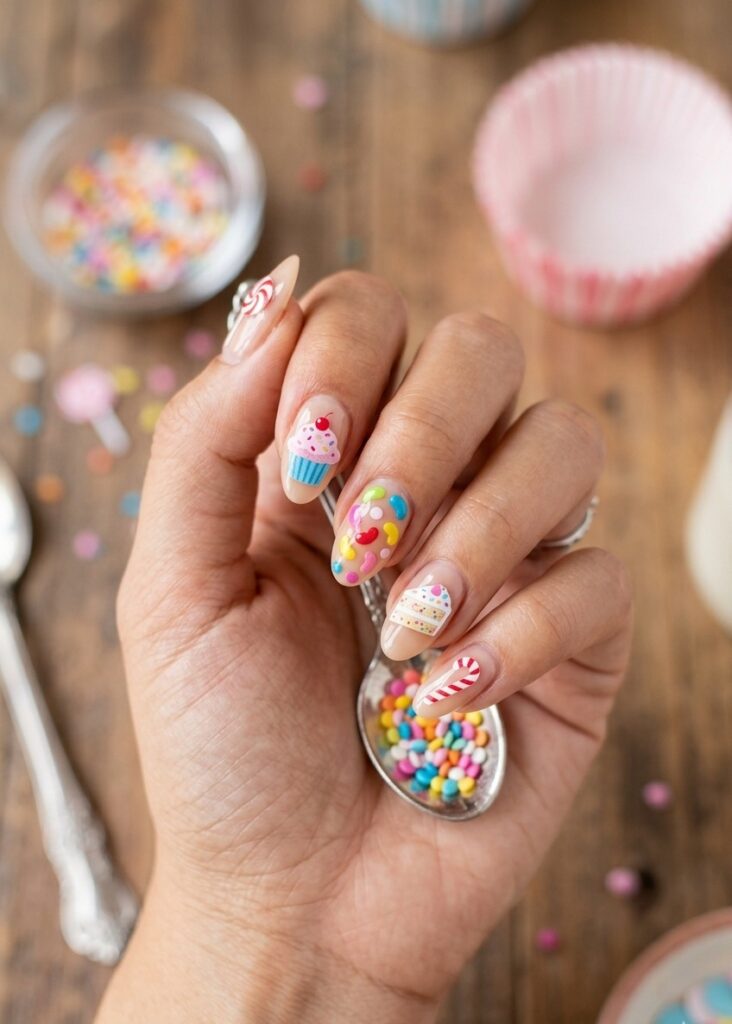
16. Sweet Treat Paper Nails
For a playful and fun design, use paper featuring sweet treats like cupcakes, candy, or donuts. This whimsical design is sure to put a smile on your face.
Essential Tips for Creating Stunning Paper Nail Designs
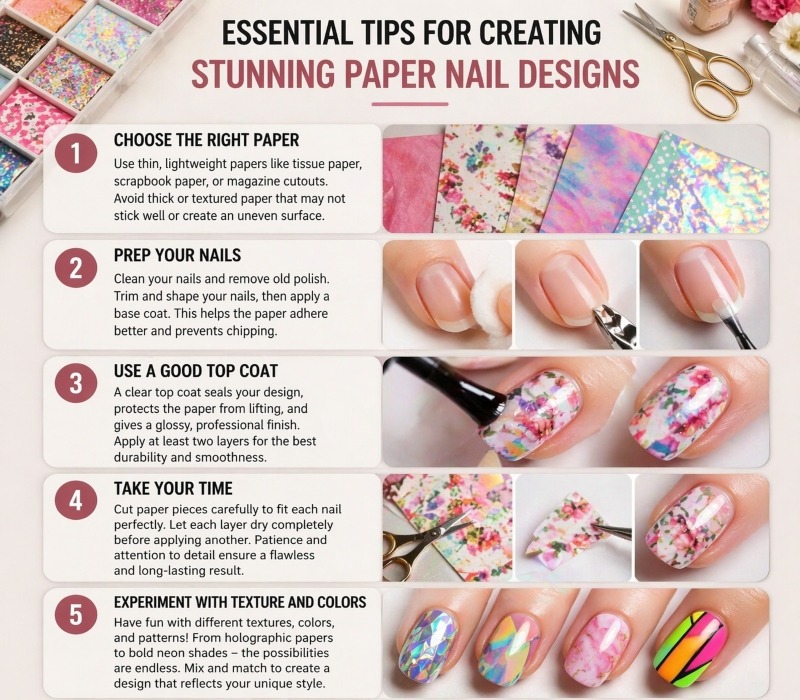
Before jumping into specific paper nail design ideas, let’s cover some essential tips to make sure your paper nail art is flawless. By following these simple tips, you’ll ensure that your designs last longer and look their best.
- Choose the Right Paper
The key to successful paper nail designs is selecting the right paper. Tissue paper, scrapbook paper, or even magazine cutouts work best. Avoid thick or textured paper that may not stick well to your nails or create an uneven surface. Thin, lightweight papers are easy to work with and mold to the nail’s shape.
- Prep Your Nails
Start by cleaning your paper nail designs and removing any old polish. Trim and shape your nails to your desired length, then apply a base coat. This ensures the paper will adhere properly and prevent the design from chipping too soon.
- Use a Good Top Coat
A clear top coat is essential for sealing your paper nail design. It protects the paper from lifting and gives your nails a glossy, professional finish. Apply at least two layers of top coat to ensure durability and smoothness.
- Take Your Time
Paper nail art requires patience. Cut your paper pieces carefully to fit each nail, and let each layer dry completely before applying another. This attention to detail will ensure that your design is flawless and long-lasting.
- Experiment with Texture and Colors
Don’t be afraid to experiment with different textures, colors, and patterns. From holographic papers to bright neon colors, the possibilities are endless. You can mix and match to create a design that reflects your unique style.
How to Make Your Paper Nail Designs Pinterest-Friendly
Pinterest is a visual platform, and to succeed on it, your paper nail designs need to stand out. Here’s how to optimize your content for Pinterest:
- High-Quality Images
Pinterest users are drawn to high-quality images. Make sure your photos are bright, well-lit, and showcase your nails clearly. Consider using a clean background to make your designs pop.
- Step-by-Step Nail Art Tutorials
Pinterest users love DIY tutorials. Create a step-by-step guide for each design, showing the materials needed, the application process, and the finished result. This format encourages users to save their pins and try the designs themselves.
FAQs
What is the hottest nail trend right now?
The hottest nail trend right now is 2026’s minimalist and geometric nail art, which continues to dominate. Clean lines, abstract shapes, and neutral tones are all the rage this year. Nail artists are also experimenting with negative space designs and negative space French tips.
Where part of the nail is left bare, offering a more modern and chic look. Metallics and holographic finishes are also popular, adding a futuristic touch to nail art.
Are paper nails better than gel nails?
Both paper nails and gel nails have their benefits, but they serve different purposes. Paper nail designs are a more budget-friendly and eco-friendly option for DIY enthusiasts, allowing for creative freedom with minimal effort. They can be applied easily at home, making them a great choice for those who love experimenting with designs without visiting a salon.
On the other hand, gel nails are known for their long-lasting wear and professional finish, but they require more time, effort, and sometimes professional help for application. Gel nails are ideal if you want something more durable and chip-resistant, while paper nails are great for short-term, creative nail art that’s easily changeable.
How to use paper forms for nails?
Using paper nail designs is simple and can add unique textures or patterns to your manicure. Here’s a quick step-by-step guide:
- Prepare Your Nails: Start by cleaning and shaping your nails. Apply a base coat to ensure a smooth surface.
- Cut the Paper: Choose a thin paper, such as tissue paper, and cut it into small pieces or desired shapes. You can also use patterned paper or even magazine clippings for more variety.
- Apply the Paper: Use a small brush or a toothpick to apply a thin layer of nail glue or clear polish onto your nail. Then, place the paper pieces on your paper nail designs, pressing gently to smooth them out.
- Seal the Design: Once the paper is in place, add a top coat to seal it. This will help the paper stick securely and give your design a glossy finish.
What is the “rich girl” nail trend?
The “rich girl” nail trend is all about luxurious, sleek, and high-end designs. Think long, almond-shaped nails with chrome finishes, diamond accents, and subtle ombré shades. Gold, silver, and pearl embellishments are often added for that extra touch of opulence.
This trend focuses on creating an overall elegant and polished look that screams luxury. It’s about making a statement with minimalistic yet chic designs that have a sophisticated vibe.
How can I create DIY paper nails at home?
Creating DIY paper nail designs at home is easy and fun! Start by selecting your favorite paper type, whether it’s tissue paper, scrapbook paper, or magazine clippings. After shaping your nails and applying a base coat, cut the paper into small pieces and place them carefully on your nails using clear nail glue.
Seal the design with a top coat to ensure long-lasting wear. The best part? You can experiment with colors, patterns, and even textures to create a unique and personalized nail look!
Can I use paper nails for special occasions?
Absolutely! Paper nail designs are versatile and can be tailored to any occasion. Whether you’re attending a wedding, a party, or a festive celebration, you can choose designs that reflect the event’s theme.
For example, you could opt for floral designs for a spring wedding, or glitter and metallic paper accents for a New Year’s Eve party. With so many design options, paper nails can elevate any outfit and make a bold statement, even for special occasions.
Do paper nails last as long as gel nails?
Paper nail designs typically don’t last as long as gel nails because they are more prone to wear and tear, especially if exposed to water or rough surfaces. However, they can last several days to a week if sealed properly with a top coat.
They’re an ideal choice for temporary nail art that you can change up based on your mood or occasion. If you’re looking for durability, gel nails would be the better option, but for creativity and variety, paper nail designs are a fun and easy alternative.
Conclusion
Paper nail designs are an exciting and accessible way to express your creativity, and in 2026, they’re more popular than ever. Whether you’re a beginner or an experienced nail artist, these stunning DIY styles allow you to transform your paper nail designs into unique pieces of art without the need for expensive salon visits.
From geometric patterns to floral prints, and even abstract collages, there’s a paper nail design for every style and occasion. Not only do these paper nail designs allow for a personalized touch, but they also reflect a growing trend toward sustainability in the beauty industry.
The best part? Paper nail art is perfect for those who love to experiment and express individuality while staying on top of trends. So, gather your materials, get inspired, and start crafting your own paper nail masterpieces today.

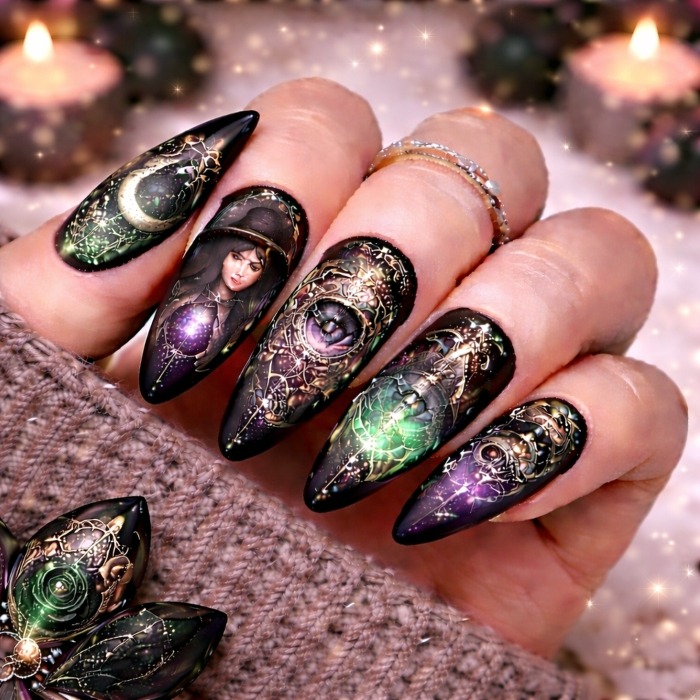
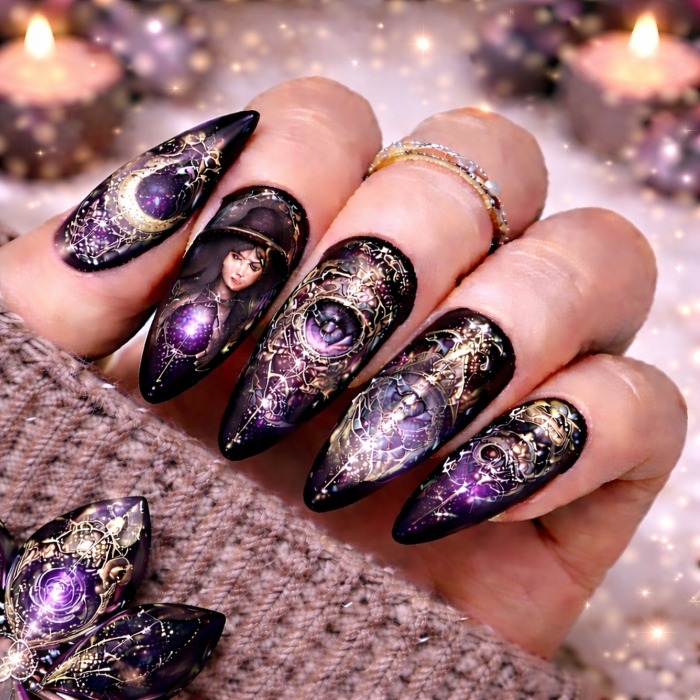
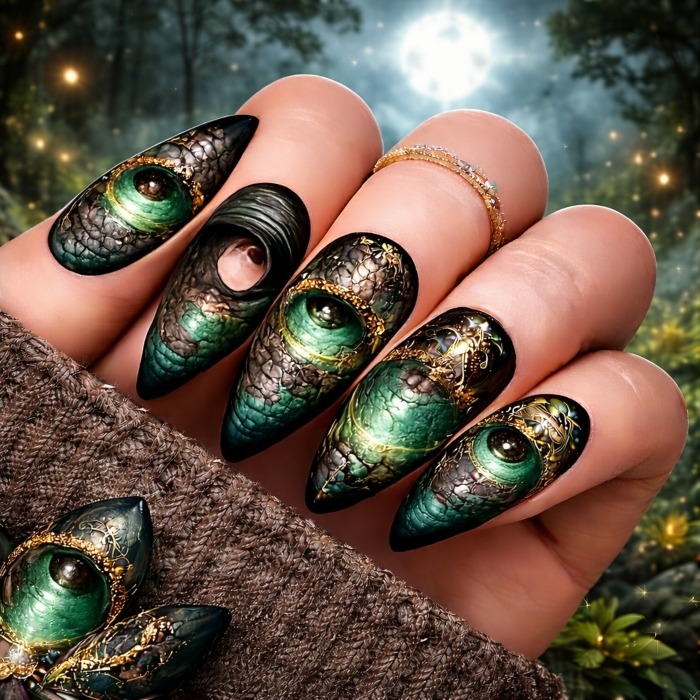
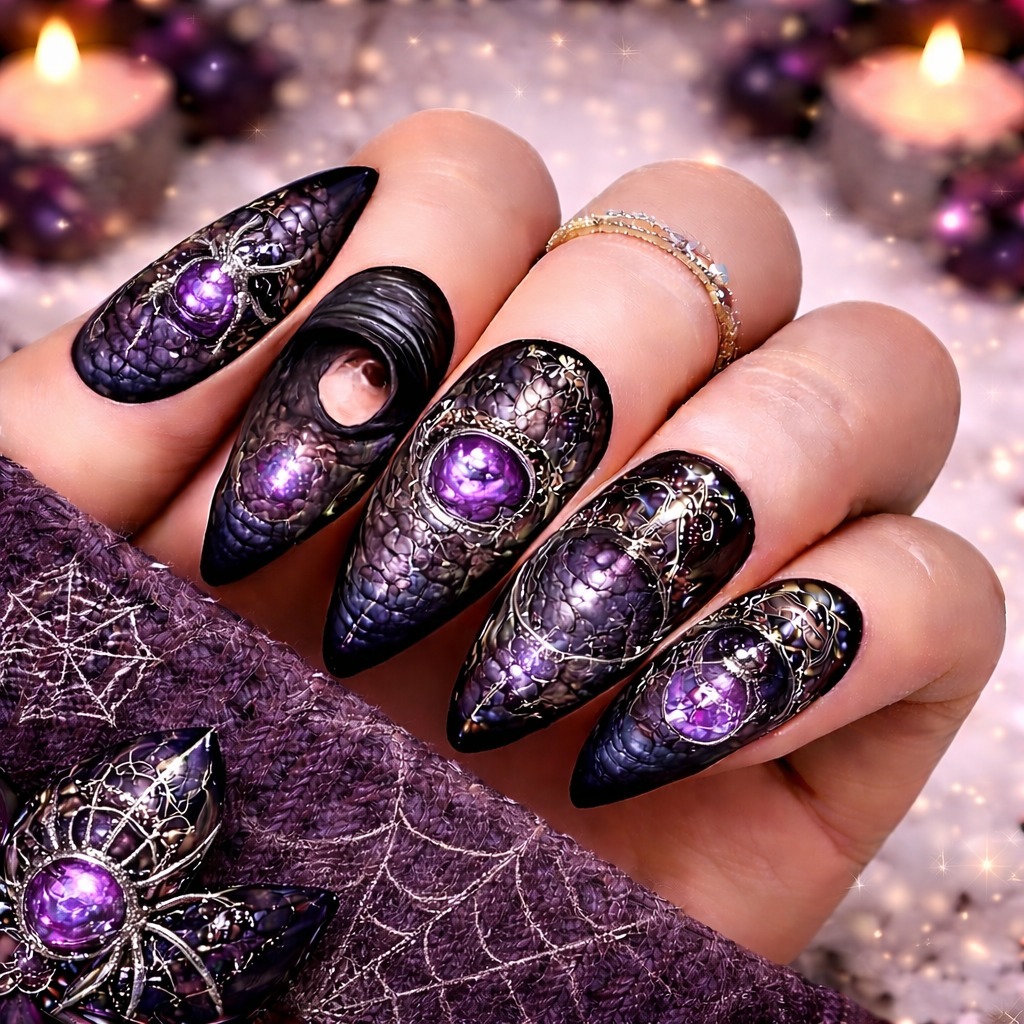
Witchy Nail Designs are having a moment in 2026. Whether it’s the fall season, Halloween, or any time of year when you want to channel your inner enchantress, these mystical and magical nail designs have become a go-to aesthetic for many.
From bold celestial symbols to gothic portraits and spooky, celestial vibes, witchy nail designs are no longer limited to October. Witchy Nail Designs are a year-round vibe that anyone can rock to express their unique style.
In this complete guide, we’ll dive deep into why witchy nails are perfect for 2026, the best witchy nail designs to try, DIY tutorials, and how to make your nails as magical as the season itself.
What Are Witchy Nail Designs?
Before we get into the specific designs, let’s break down what witchy nail designs actually are. Witchy nail designs are more than just Halloween-themed designs—they are a style of nail art that draws inspiration from witchcraft, mysticism, gothic aesthetics, and magical elements. Witchy Nail Designs include a mix of dark, ethereal motifs like:
- Crescent moons and stars
- Spiders and webs
- Tarot symbols and magical glyphs
- Dark, mystical colors like black, purple, and green
Witchy Nail Designs can be subtle or bold, with intricate details or minimalist symbols, making them versatile for different occasions and personal styles. In 2026, the witchy aesthetic has evolved, combining classic gothic vibes with modern, magical elements like celestial Witchy Nail Designs and vibrant neons, making them the perfect choice for any seasonal occasion.
Top Witchy Nail Designs for 2026
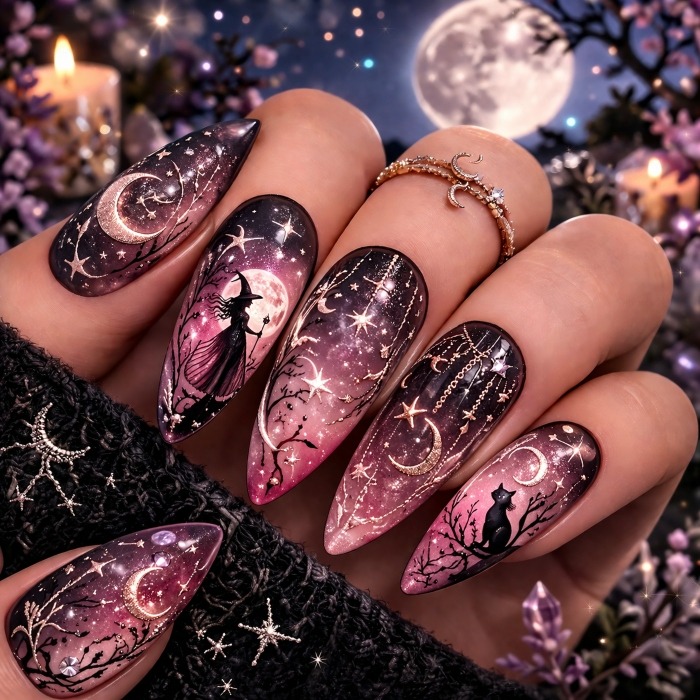
1. Celestial Moon & Stars Nails
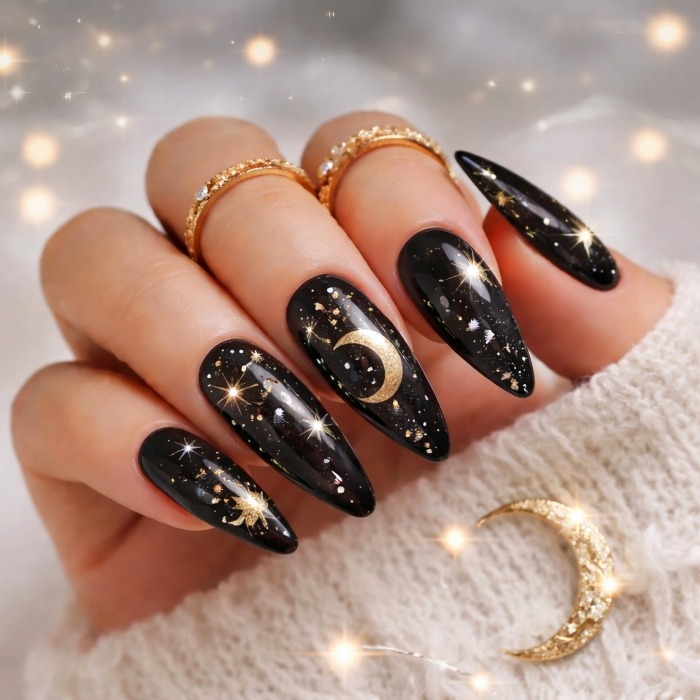
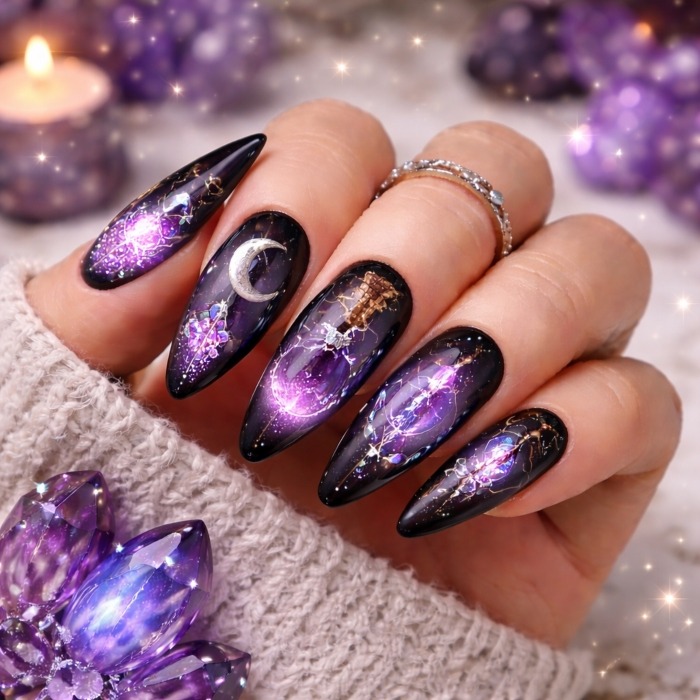
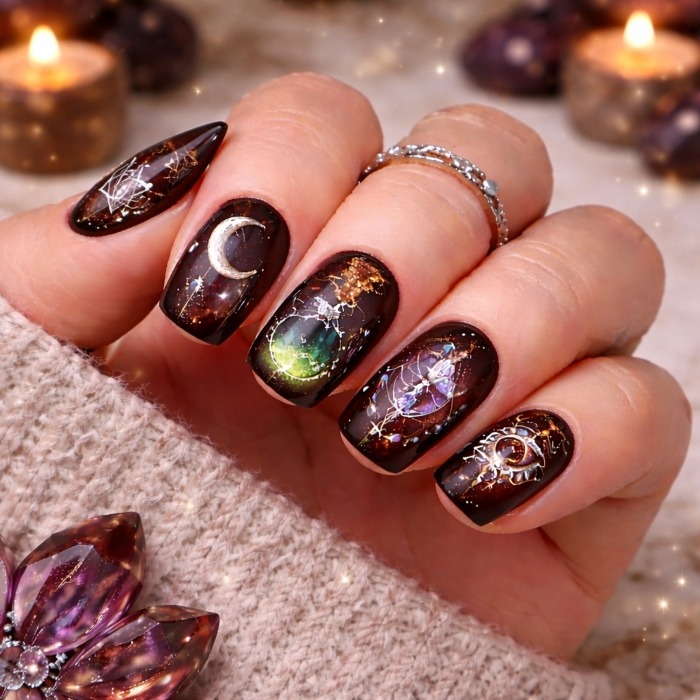
A deep black base paired with golden crescent moons and sparkling stars scattered across the nails. Witchy Nail Designs capture the magic of the night sky, perfect for anyone looking to bring mystical energy into their nails. Simple yet mesmerizing, this design works well for both casual and festive occasions.
2. Poison Green Potion Nails
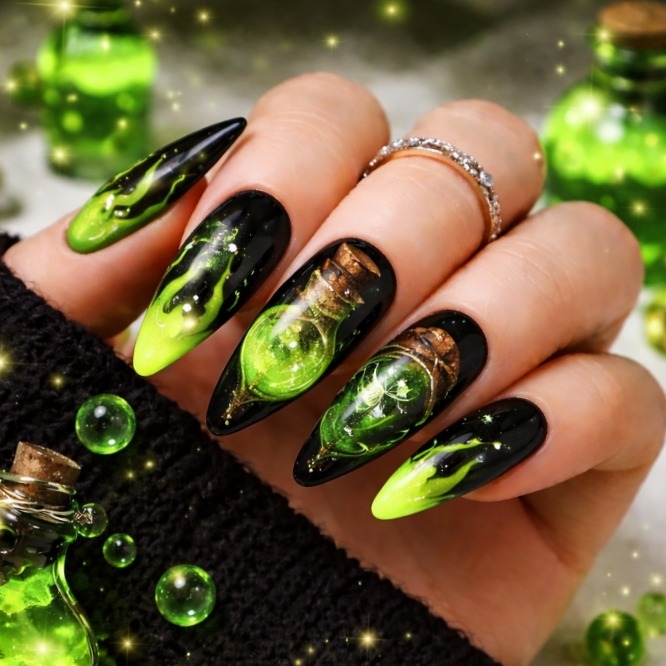
Neon green flames and potion bottles in vibrant hues with a dark background create a bold and spooky look. Witchy Nail Designs evoke a sense of mystical danger and magic, perfect for a witchy Halloween vibe or anytime you want your nails to look otherworldly.
3. Pastel Goth Witch Nails
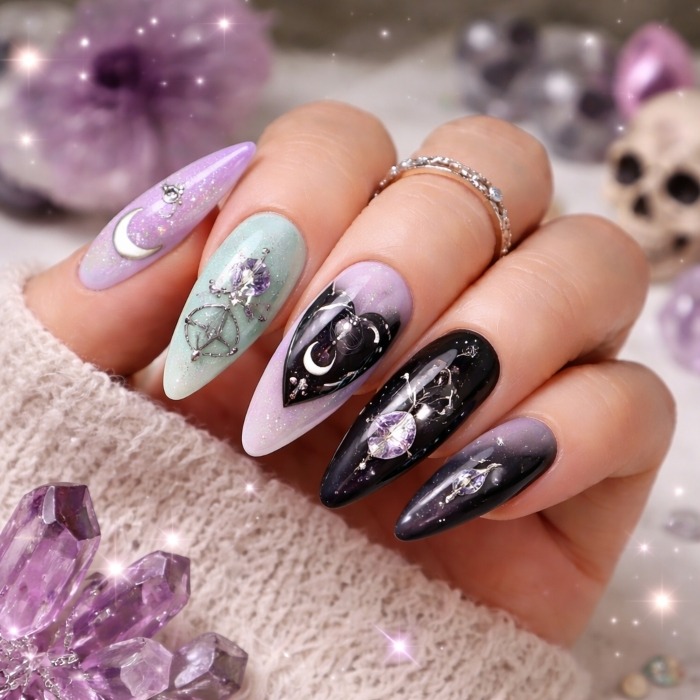
A beautiful combination of soft pastel shades like lavender, mint green, and pale pink, with delicate witchy symbols like pentagrams and crystals. Witchy Nail Designs blend gothic vibes with subtle witchy elements, making it a great choice for those who prefer a more elegant yet mysterious look.
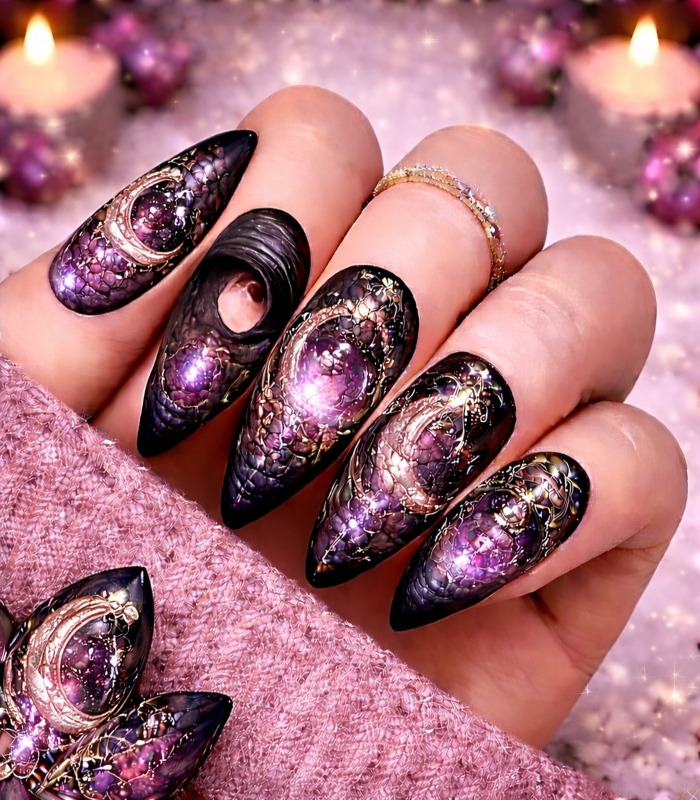
4. Full Moon Witch Nails
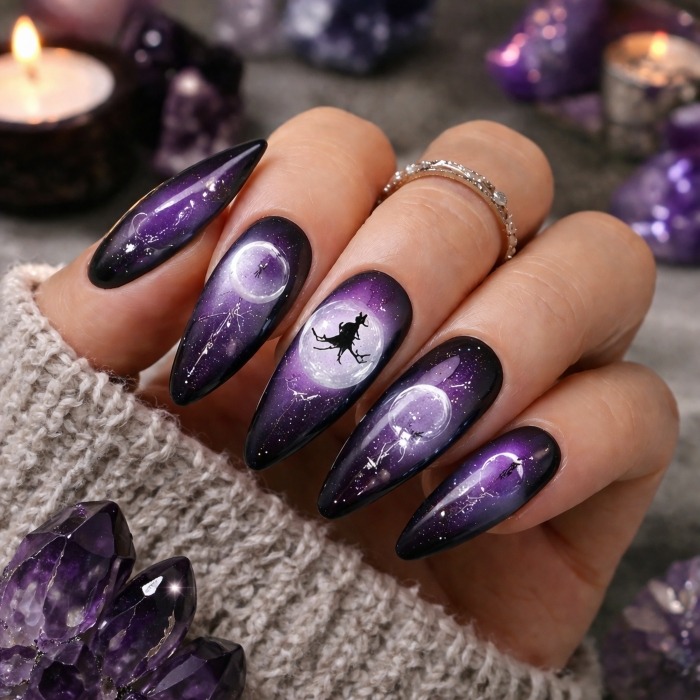
Full moon designs in the center of each nail, set against a dark purple or black background. Witchy Nail Designs evoke a sense of witchcraft and mysticism, perfect for those who want a bold, celestial-themed look to complement their witchy aesthetic.
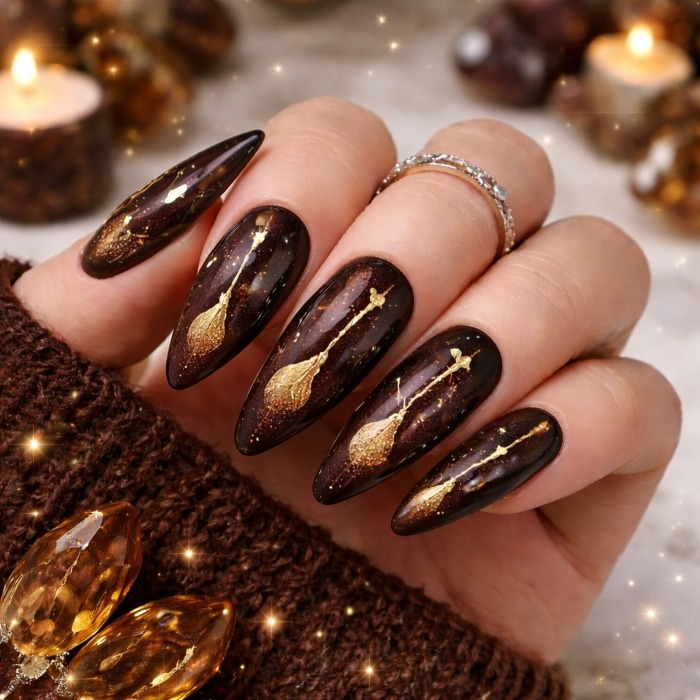
5. Witch’s Broomstick Nails
These nails feature tiny golden broomsticks painted on a dark brown base, symbolizing classic witchy motifs. Paired with subtle sparkles or moon symbols, Witchy Nail Designs create a playful, charming witchy vibe, great for adding a touch of whimsy to your look.
6. Spider Web Nails
Black nails with white spider webs on the tips or Witchy Nail Designs. Add tiny spiders to complete the design, making this a spooky yet stylish witchy nail look. Perfect for Halloween or any season when you want to embrace your dark side.
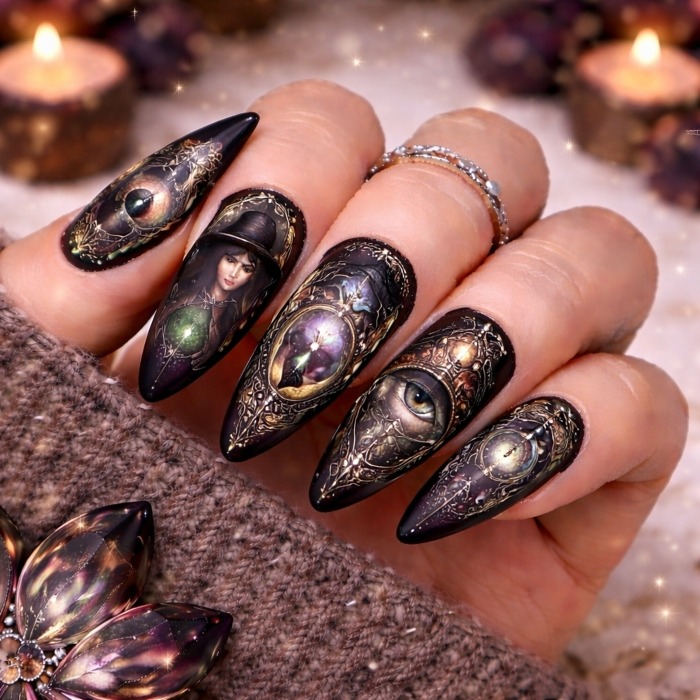
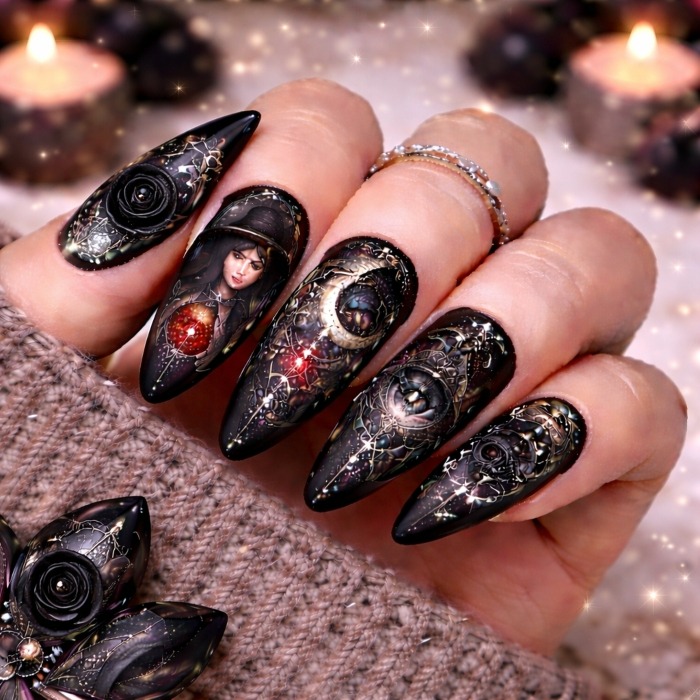
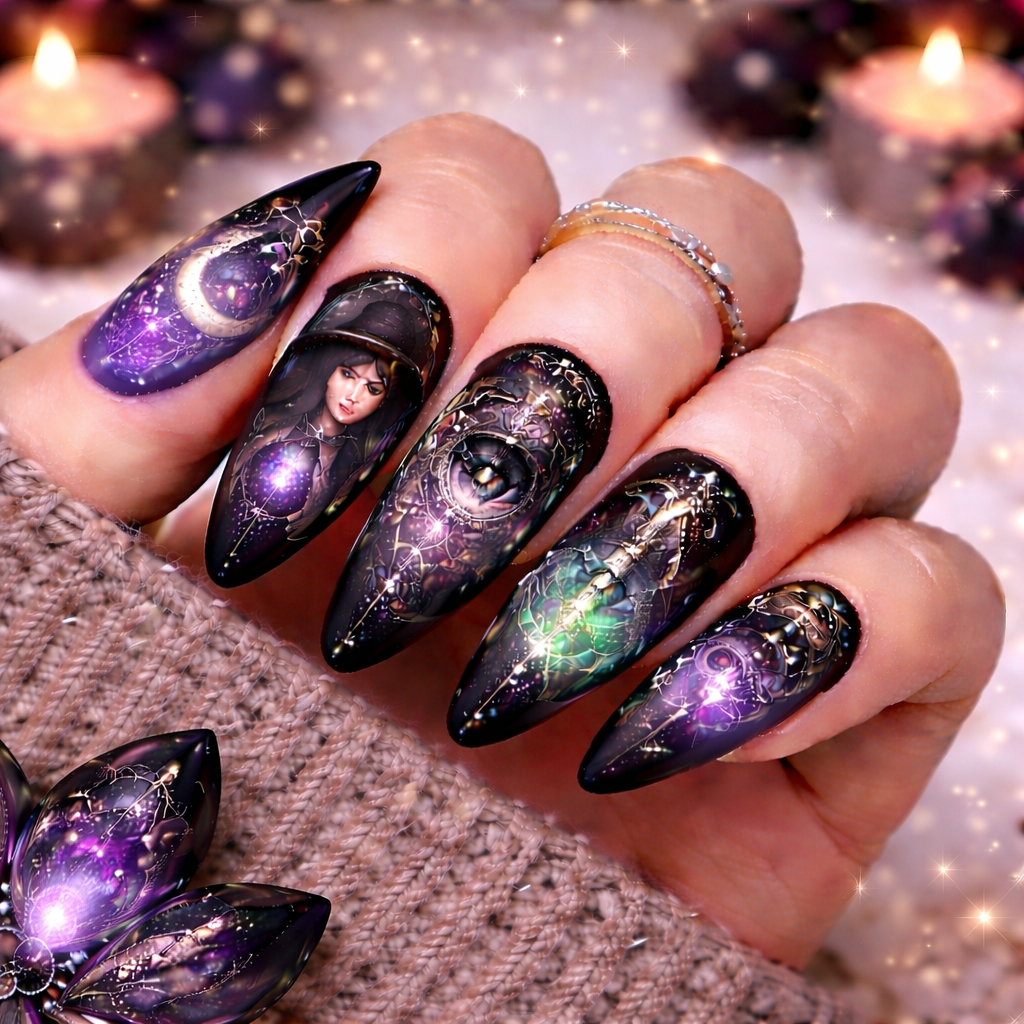
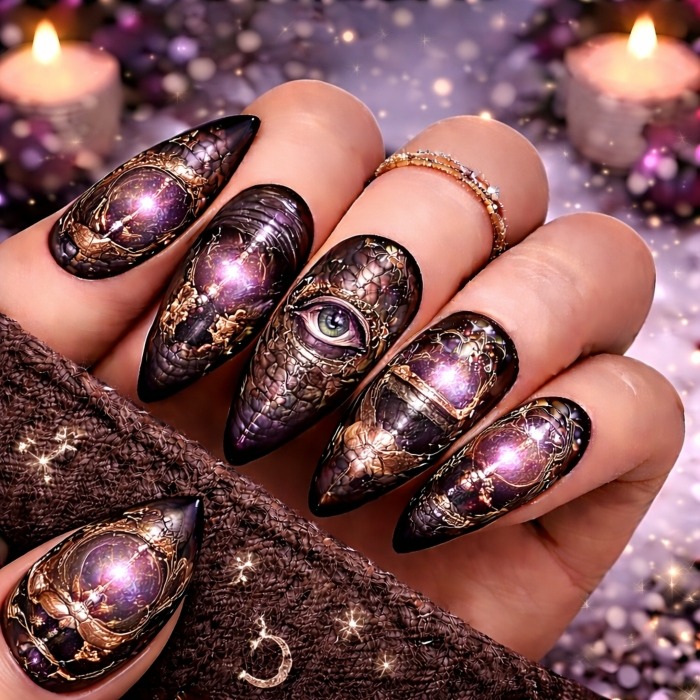
7. Creepy Eyes Nails
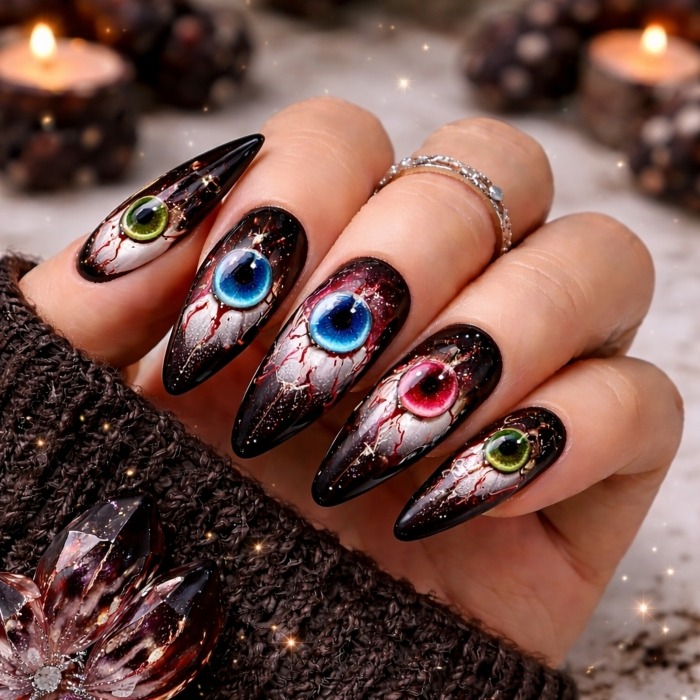
Bold eye designs featuring evil eyes, all-seeing eyes, or mystical gazes painted on black, red, or purple nails. Witchy Nail Designs are dramatic, powerful, and perfect for anyone who wants to make a statement with their witchy nails.
8. Crystal Witch Nails
Painted with amethyst, rose quartz, and other crystal designs, Witchy Nail Designs use subtle pastel tones and geometric shapes to reflect the healing properties of crystals. This design is perfect for those who love both witchcraft and spiritual wellness.
9. Witchcraft Symbols on Short Nails
Minimalist witchcraft symbols like pentagrams, Witchy Nail Designs, and magical glyphs on short nails. With a nude base or subtle black accents, this design adds a witchy touch without going overboard—ideal for a more understated look.
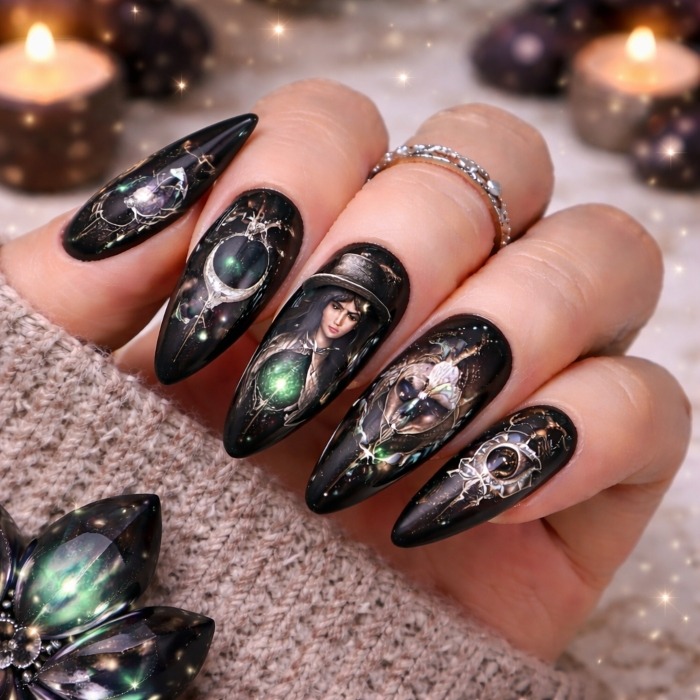
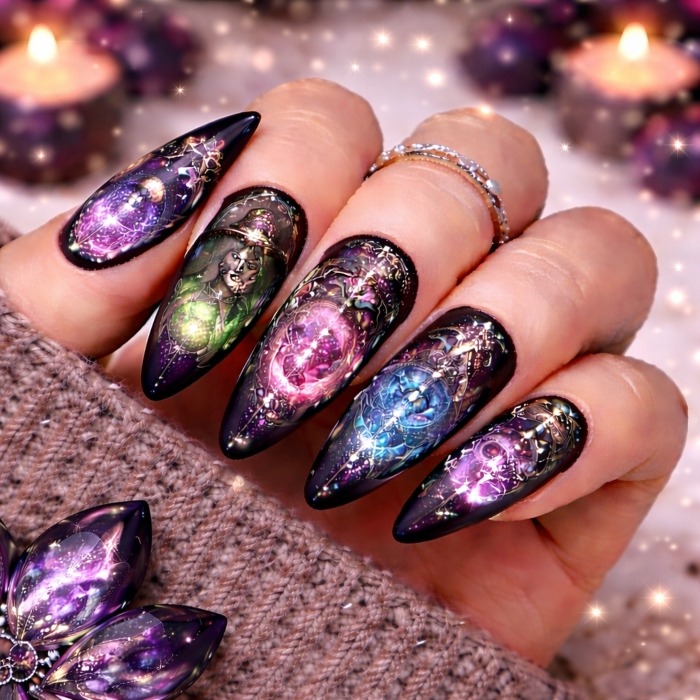
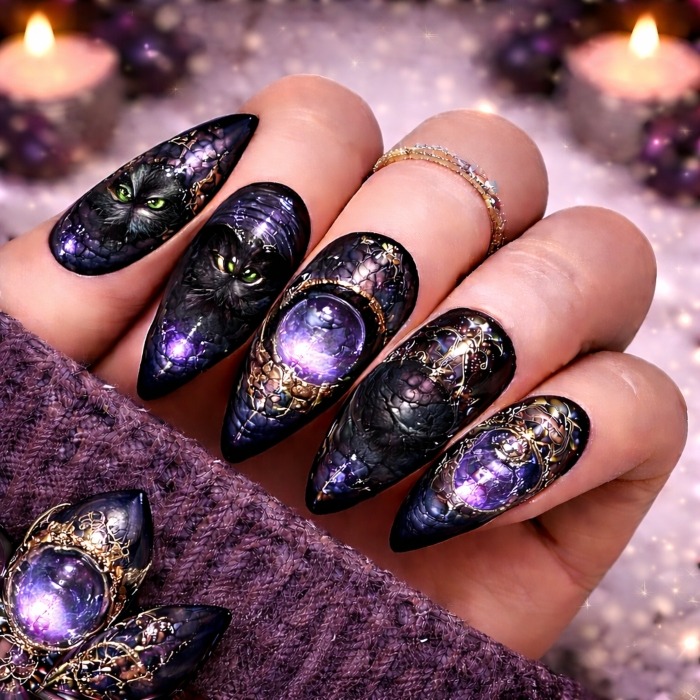
10. Gothic Witch Portraits
A dramatic stiletto nail design featuring gothic portraits of witches, with intricate dark makeup, moonlit backgrounds, and other mysterious imagery. Witchy Nail Designs are bold and empowering, perfect for those who want to embrace the dark goddess energy.
11. Witchy Eye and Moon Nails
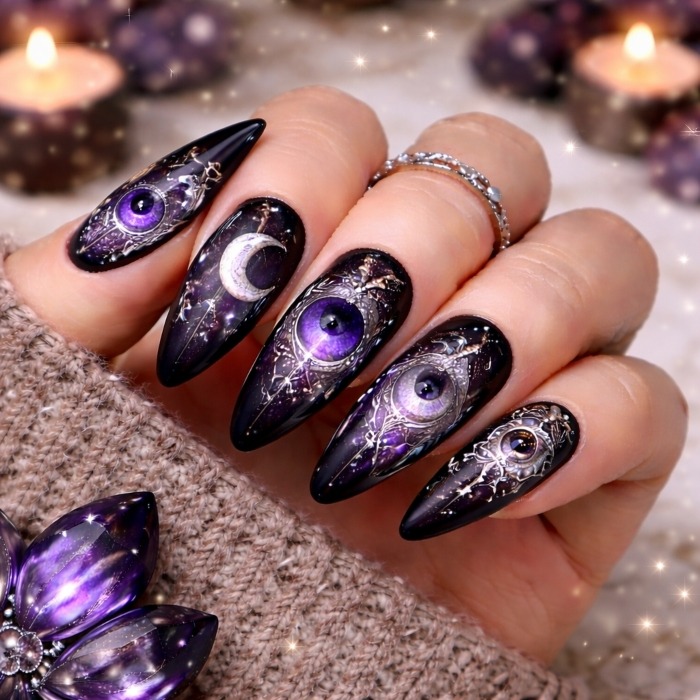
Eye symbols paired with crescent moons in shimmering gold or silver accents on a black or dark purple base. Witchy Nail Designs invoke both mysticism and celestial magic, making it perfect for witchy individuals who also love the night sky.
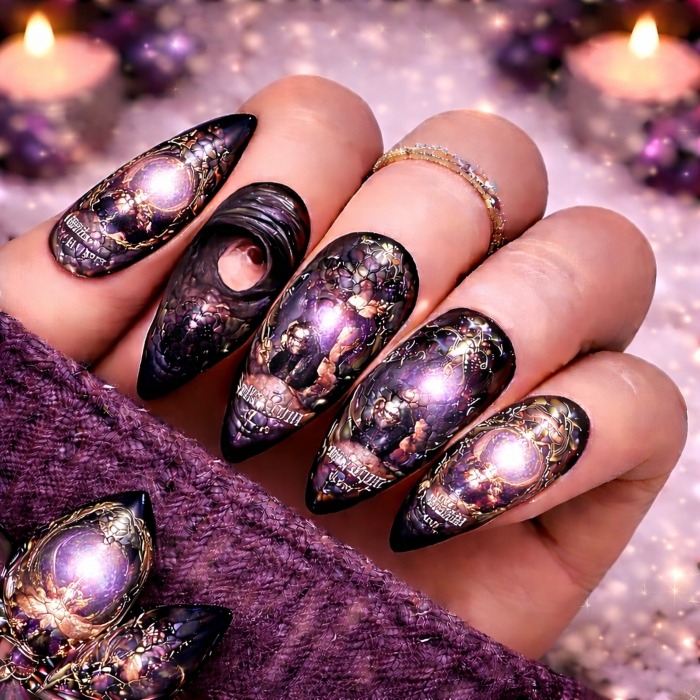
12. Witchcraft Tarot Cards Nails
Tarot card designs featuring symbols like The Moon, The Devil, and The High Priestess are painted on each nail. Witchy Nail Designs draw inspiration from witchcraft and divination, making it a must-try for those fascinated with spirituality and the occult.
13. Cosmic Witch Nails

Inspired by the stars, planets, and the cosmos, this design features deep purples, blues, and blacks with celestial designs. Perfect for space enthusiasts who want to combine witchy vibes with cosmic energy.
14. Witch’s Potion Bottle Nails
Featuring tiny potion bottles, cauldrons, and magical elixirs, this design uses vibrant colors like green, purple, and orange for a more spooky effect. Witchy Nail Designs are fun and filled with mystical power, perfect for spooky events.
15. Black Rose Witch Nails
Black roses or dark floral motifs painted on black Witchy Nail Designs with gold or silver accents. This design evokes a gothic, witchy vibe, perfect for those who want a touch of dark romance while keeping their nails chic.
16. Faded Witchy Gradient Nails
An ombre-style fade from black to orange with small witchy symbols like crystals, moons, or bats scattered throughout. Witchy Nail Designs are perfect for someone who loves bold colors but wants to keep it mysterious and magical.
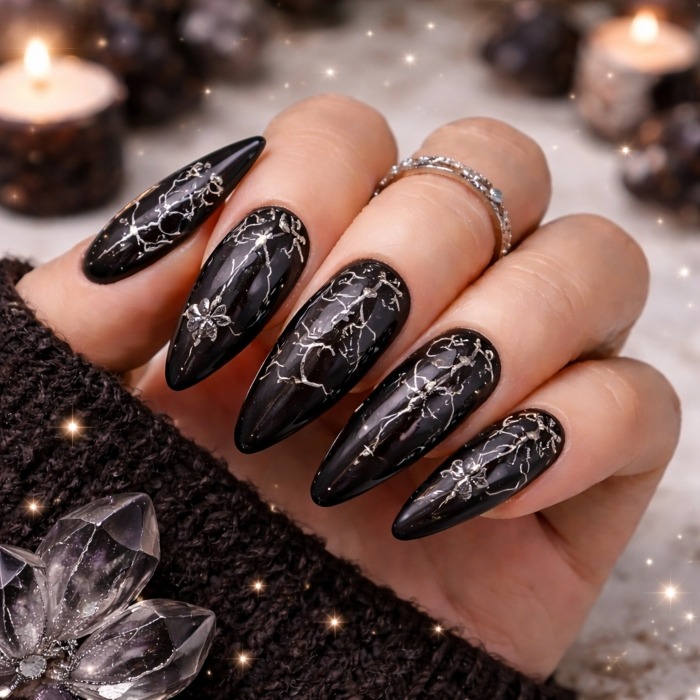
17. Celtic Witch Designs
Intricate Celtic knots, runes, and symbols drawn on a neutral base with subtle gold or silver accents. Witchy Nail Designs are perfect for those who enjoy ancient witchcraft and want a blend of mysticism and history.
18. Glam Witch Nails
A sparkling base with witchy symbols like stars, pentagrams, or moons outlined in gold or silver. Witchy Nail Designs add a glamorous twist to the classic witchy look, making it great for those who love both shine and witchcraft.
19. Mystic Eye Witch Nails
A large eye design is painted on each nail in vibrant colors, featuring golden accents or fine details. This design is bold, mystical, and perfect for anyone who loves esoteric symbolism and wants to make a statement.
20. Witchy Spider Web Nails
Spider webs painted with thin lines on black or white nails, with tiny spiders perched on them. This spooky yet stylish design is perfect for adding a little Halloween charm to your nails.
21. Witch’s Familiar Cat Nails
A cute black cat design on nails with tiny moons and magical symbols. This design brings the witchy familiar into the spotlight, adding a fun, cute, and spooky touch to your nails.
22. Dark Moon Crescent Nails
Crescent moons painted in gold or silver on a dark purple background, with tiny stars sprinkled around. This elegant yet mysterious design is perfect for anyone who loves celestial witchy vibes with a subtle touch.
23. Witchy Tarot Card Nails
Tarot card-themed nails, with each card representing a different witchy or mystical symbol. Designs may include The Moon, The Fool, or Death card—each nailed to one of the fingers for a complete divination-inspired look.
24. Moonlit Witch Nails
A moonlit sky with silhouettes of witches flying across purple gradients and starry accents. This design channels a whimsical and romantic witch vibe, perfect for nighttime wear.
25. Witchy Spellbook Nails
Tiny spellbook illustrations painted on deep green or black nails. You can also add ancient symbols and magical runes to complete the mystical look.
Why Witchy Nail Designs Are Perfect for 2026
Nail Trends 2026
Witchy nail designs are trending in 2026 because they perfectly align with the 2026 nail trends that emphasize bold, expressive designs. In recent years, nails have become more of a canvas for self-expression. People are not afraid to show off their unique personalities with trendy colors, intricate designs, and fun motifs.
In 2026, Witchy Nail Designs are an ideal fit because they allow nail artists to blend dark, mystical elements with modern trends. For example, celestial designs, like moons and stars, are hugely popular, and witchy nails feature these elements in a way that’s fresh, edgy, and full of mystical energy.
Seasonal Relevance
While witchy nails are perfect for Halloween, they’re also timeless and perfect for any season, especially fall. The spooky aesthetic and celestial energy of witchy nails align with the darker, mysterious vibe of the autumn months. As the season changes, these designs bring a magical touch that complements fall colors, cozy vibes, and pumpkin-spiced everything.
FAQs
What Color Are Witches’ Nails?
Witches’ nails are often associated with mysticism and magic. Black nails symbolize connection to the dark arts and protection. Purple represents spiritual strength and intuition, while green is linked to growth and healing. Silver nails are often used for moon magic and celestial energy.
What Are Rich Girl Nails?
Rich girl nails are characterized by elegance and luxury, often featuring neutral colors like nude, soft pinks, or French tips. These designs focus on simple sophistication, with accents like chrome or gold to add a premium feel. They convey wealth and high fashion in a subtle way.
What Do Nails Represent in Witchcraft?
In witchcraft, nails represent personal power and protection. Black nails are used to banish negative energy, while designs like crescent moons or crystals channel spiritual strength. They are also seen as tools for intention-setting, with each design enhancing different types of magic or personal energy.
What Are the Most Seductive Nail Colors?
The most seductive nail colors include red, which symbolizes passion and desire, and deep burgundy, representing mystery and confidence. Black nails add an air of mystical strength, while metallics like gold and chrome convey luxury and elegance, enhancing the alluring appeal.
Conclusion
Witchy nails are not just a passing trend; in 2026, they have become a timeless and magical aesthetic that anyone can embrace throughout the year. Whether you’re channeling your inner witch for Halloween, the fall season, or just love mystical designs, these nails offer a way to express your personal style with bold celestial symbols, gothic elements, and spooky motifs.
From neon green potion nails to full moon designs, there’s a witchy nail design for everyone. The combination of dark, mystical elements with modern trends makes witchy nails the perfect go-to look for 2026. These designs are ideal for creating seasonal magic and adding a bit of mysticism to any occasion.
So, whether you are looking to create a bold statement or prefer a more subtle witchy aesthetic, this complete guide provides all the inspiration you need to perfect your witchy nails. Embrace the spiritual energy, empowerment, and mystical vibes that witchy nails bring, and let your nails become the canvas for magic this season!

 Spring Nail Designs3 weeks ago
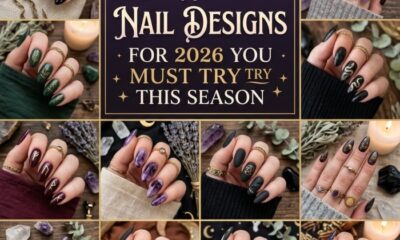
25 Witchy Nail Designs for 2026 You Must Try This Season
- Spring Nail Shapes2 weeks ago
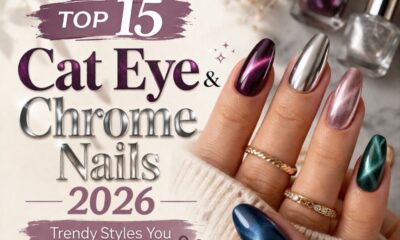
Top 15 Cat Eye & Chrome Nails 2026: Trendy Styles You Need to Try!
- Spring Nail Shapes2 weeks ago
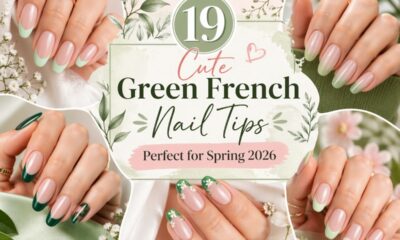
19 Cute Green French Nail Tips Perfect for Spring 2026
- DIY Spring Nails3 weeks ago
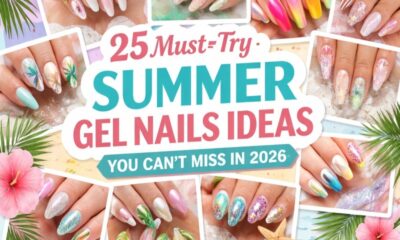
25 Must-Try Summer Gel Nails Ideas You Can’t Miss in 2026
- Spring Nail Shapes2 weeks ago
18 Almond Shaped Nails Ideas for the Perfect Spring Manicure 2026
- Spring Nail Designs2 weeks ago
16 Stunning Paper Nail Designs 2026: Easy DIY Styles to Try at Home
- DIY Spring Nails1 week ago
21 Cute July Nail Ideas 2026 for a Fresh Summer Vibe
- Trending Shapes1 week ago
25 Must-Try Trending Nail Designs for 2026: Stay Ahead of the Curve